No Image

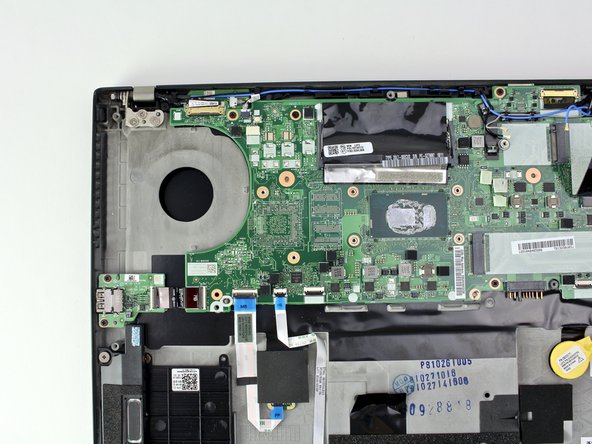
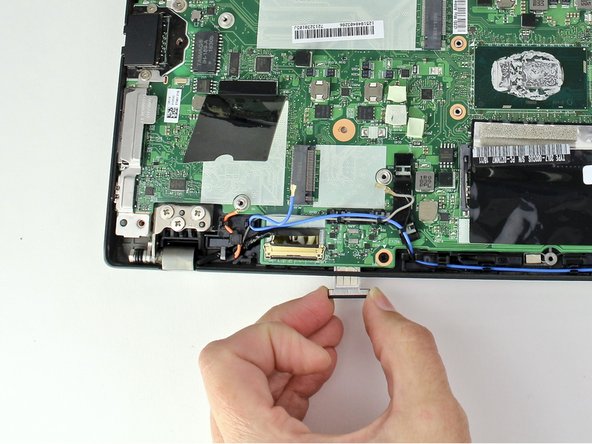
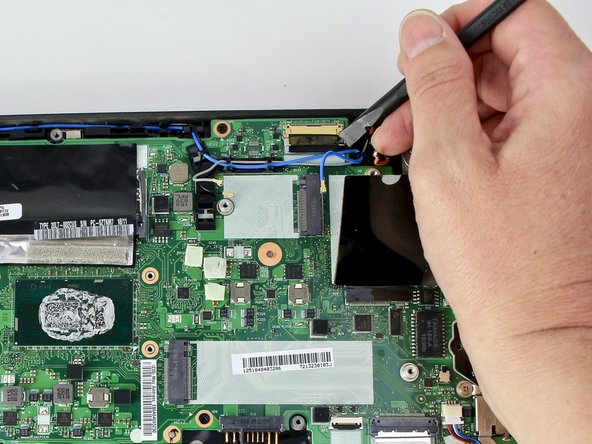
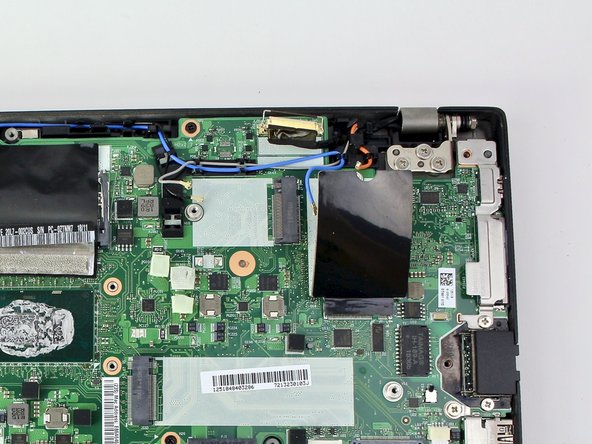
Замена платы кнопки питания ноутбука Lenovo ThinkPad T480s

СОДЕРЖАНИЕ
82 просмотров
12 декабря 2023

Введение

Используйте это руководство для замены платы кнопки питания в ноутбуке Lenovo ThinkPad T480s.

Плата кнопки питания содержит кнопку, при нажатии на которую включается компьютер. Диагностика неисправной кнопки питания может оказаться непростой задачей, поскольку некоторые симптомы похожи на неисправную батарею или адаптер переменного тока. Если вы нажимаете кнопку питания, но ваш ноутбук не включается, ознакомьтесь с этим руководством по устранению неполадок Lenovo ThinkPad, прежде чем пытаться заменить плату кнопки питания.

Если вам необходимо произвести замену, обязательно отключите внутреннюю батарею, выключите устройство и отсоедините его от внешних источников питания, прежде чем приступать к работе.

Шаг 1 Нижняя крышка

Lenovo ThinkPad T480s Power Button Board Replacement, Bottom Cover: step 1, image 1 of 2Lenovo ThinkPad T480s Power Button Board Replacement, Bottom Cover: step 1, image 2 of 2

Перед началом работы отключите аккумулятор, выключите устройство и отсоедините адаптер питания от устройства.

Ослабьте шесть невыпадающих винтов с помощью крестообразной отвертки №1.

Шаг 2

Lenovo ThinkPad T480s Power Button Board Replacement: step 2, image 1 of 3Lenovo ThinkPad T480s Power Button Board Replacement: step 2, image 2 of 3Lenovo ThinkPad T480s Power Button Board Replacement: step 2, image 3 of 3

Снимите нижнюю крышку с помощью инструмента для открывания.

Начните с верхнего края возле петли и двигайтесь вдоль края, пока не отстегнете все фиксаторы.

Шаг 3

Lenovo ThinkPad T480s Power Button Board Replacement: step 3, image 1 of 2Lenovo ThinkPad T480s Power Button Board Replacement: step 3, image 2 of 2

Поднимите нижнюю крышку.

Шаг 4 Батарея

Lenovo ThinkPad T480s Power Button Board Replacement, Battery: step 4, image 1 of 2Lenovo ThinkPad T480s Power Button Board Replacement, Battery: step 4, image 2 of 2

С помощью отвертки Phillips #1 открутите четыре винта 4,5 мм, которые крепят батарею к средней рамке.

Шаг 5

Lenovo ThinkPad T480s Power Button Board Replacement: step 5, image 1 of 3Lenovo ThinkPad T480s Power Button Board Replacement: step 5, image 2 of 3Lenovo ThinkPad T480s Power Button Board Replacement: step 5, image 3 of 3

Приподнимите батарею возле разъема и извлеките ее из системы.

Шаг 6 Клавиатура

Lenovo ThinkPad T480s Power Button Board Replacement, Keyboard: step 6, image 1 of 3Lenovo ThinkPad T480s Power Button Board Replacement, Keyboard: step 6, image 2 of 3Lenovo ThinkPad T480s Power Button Board Replacement, Keyboard: step 6, image 3 of 3

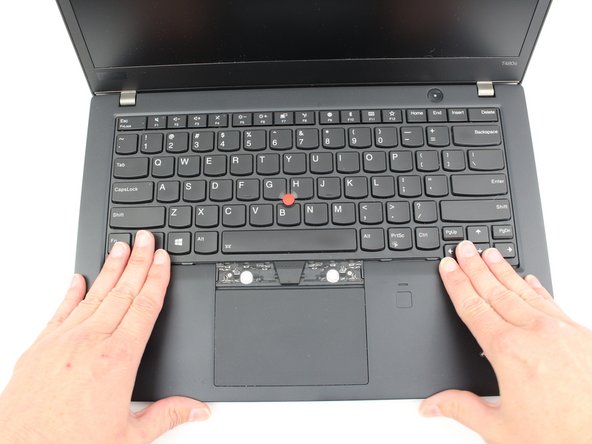
Перед началом работы отключите батарею, выключите питание и выньте вилку из розетки.

Подденьте левую и правую кнопки трекпада с помощью палочки.

Шаг 7

Lenovo ThinkPad T480s Power Button Board Replacement: step 7, image 1 of 2Lenovo ThinkPad T480s Power Button Board Replacement: step 7, image 2 of 2

Отверткой Phillips #0 открутите два невыпадающих винта под левой и правой кнопками трекпада.

Шаг 8

Lenovo ThinkPad T480s Power Button Board Replacement: step 8, image 1 of 3Lenovo ThinkPad T480s Power Button Board Replacement: step 8, image 2 of 3Lenovo ThinkPad T480s Power Button Board Replacement: step 8, image 3 of 3

Подсуньте пробойник под передний край клавиатуры, чтобы сдвинуть клавиатуру к задней панели системы.

Приподнимите передний край клавиатуры на несколько миллиметров.

Шаг 9

Lenovo ThinkPad T480s Power Button Board Replacement: step 9, image 1 of 2Lenovo ThinkPad T480s Power Button Board Replacement: step 9, image 2 of 2

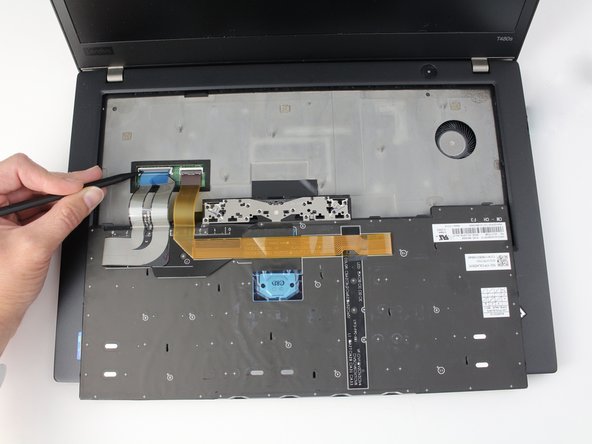
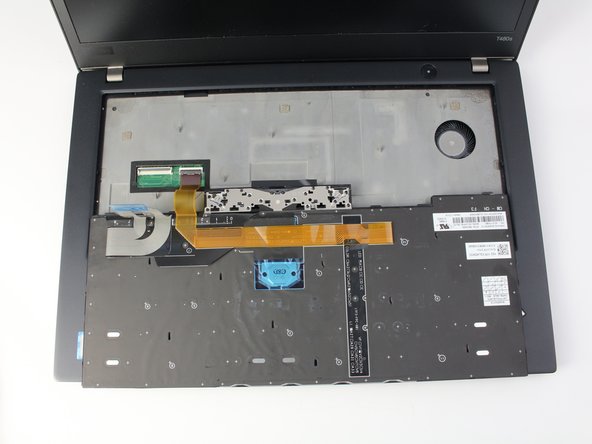
Аккуратно вытащите клавиатуру из ободка и переверните ее.

Она соединена с кабелями клавиатуры и трекпада, поэтому не дергайте ее, чтобы не порвать их.

Шаг 10

Lenovo ThinkPad T480s Power Button Board Replacement: step 10, image 1 of 3Lenovo ThinkPad T480s Power Button Board Replacement: step 10, image 2 of 3Lenovo ThinkPad T480s Power Button Board Replacement: step 10, image 3 of 3

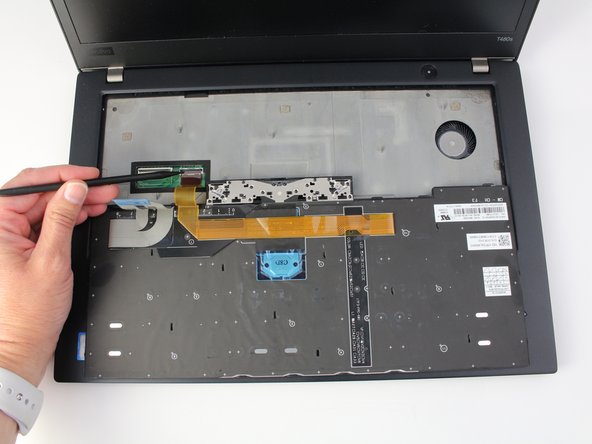
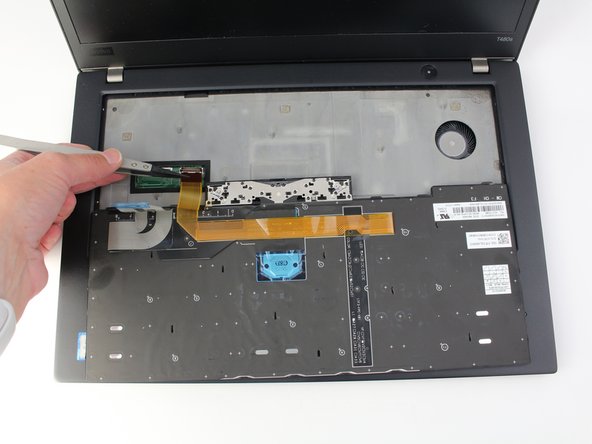
С помощью пассатижей отсоедините кабель трекпада от системы.

Более подробную информацию о типах разъемов вы найдете в этом руководстве.

Шаг 11

Lenovo ThinkPad T480s Power Button Board Replacement: step 11, image 1 of 3Lenovo ThinkPad T480s Power Button Board Replacement: step 11, image 2 of 3Lenovo ThinkPad T480s Power Button Board Replacement: step 11, image 3 of 3

С помощью пробки отсоедините кабель клавиатуры от системы.

Шаг 12

Lenovo ThinkPad T480s Power Button Board Replacement: step 12, image 1 of 2Lenovo ThinkPad T480s Power Button Board Replacement: step 12, image 2 of 2

Поднимите клавиатуру с подставки для ладоней.

Шаг 13 Твердотельный накопитель

Lenovo ThinkPad T480s Power Button Board Replacement, SSD: step 13, image 1 of 2Lenovo ThinkPad T480s Power Button Board Replacement, SSD: step 13, image 2 of 2

С помощью отвертки Phillips #1 открутите один винт 2,8 мм, крепящий SSD.

Шаг 14

Lenovo ThinkPad T480s Power Button Board Replacement: step 14, image 1 of 3Lenovo ThinkPad T480s Power Button Board Replacement: step 14, image 2 of 3Lenovo ThinkPad T480s Power Button Board Replacement: step 14, image 3 of 3

Вытащите твердотельный накопитель из гнезда.

Шаг 15 Оперативная память

Lenovo ThinkPad T480s Power Button Board Replacement, RAM: step 15, image 1 of 3Lenovo ThinkPad T480s Power Button Board Replacement, RAM: step 15, image 2 of 3Lenovo ThinkPad T480s Power Button Board Replacement, RAM: step 15, image 3 of 3

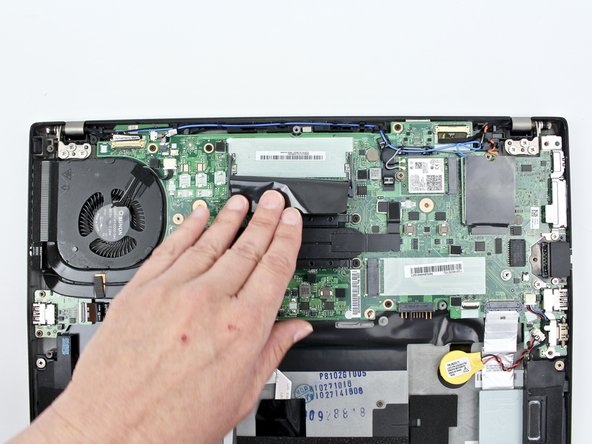
Потяните пластиковую пленку назад.

Нажмите на фиксаторы, чтобы освободить планку оперативной памяти.

В моем устройстве нет оперативной памяти, поэтому вы ее не увидите.

Планка оперативной памяти выскочит под углом. Вытащите планку оперативной памяти под тем же углом.

Шаг 16 Карта Wi-Fi

Lenovo ThinkPad T480s Power Button Board Replacement, Wi-Fi Card: step 16, image 1 of 3Lenovo ThinkPad T480s Power Button Board Replacement, Wi-Fi Card: step 16, image 2 of 3Lenovo ThinkPad T480s Power Button Board Replacement, Wi-Fi Card: step 16, image 3 of 3

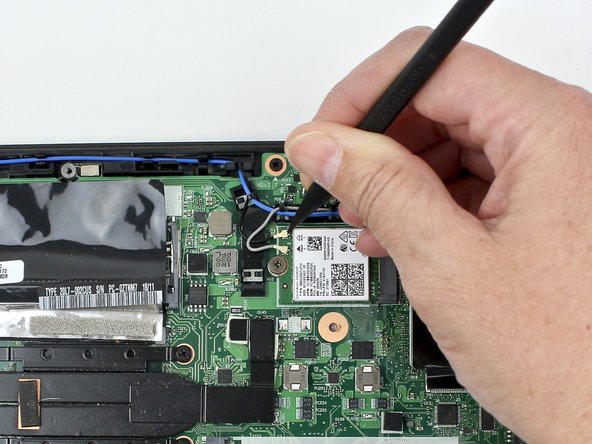
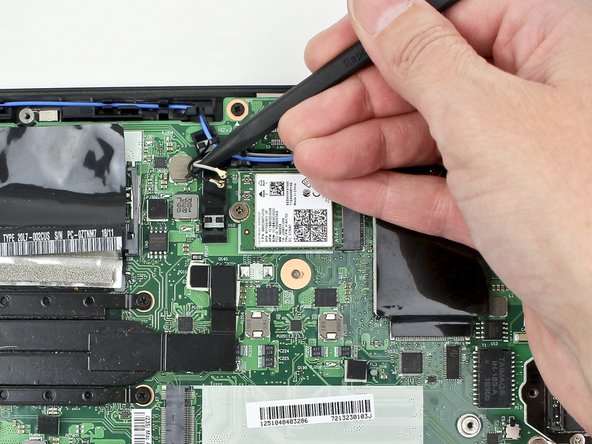
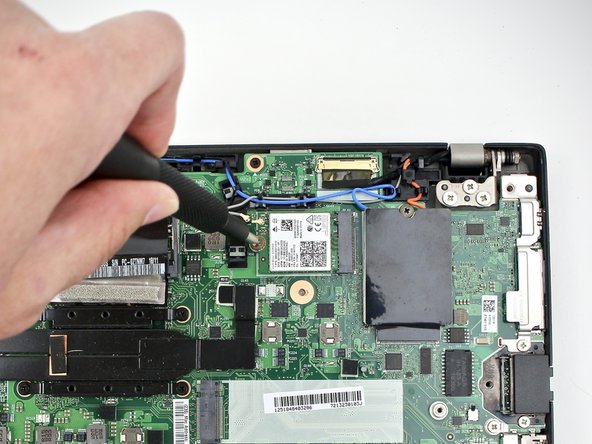
С помощью нейлоновой лопатки отсоедините коаксиальные провода антенны от карты Wi-Fi.

При сборке снова подключите серый провод, расположенный ближе к винту, и черный провод с другой стороны от серого провода.

Шаг 17

Lenovo ThinkPad T480s Power Button Board Replacement: step 17, image 1 of 2Lenovo ThinkPad T480s Power Button Board Replacement: step 17, image 2 of 2

С помощью отвертки Phillips #1 выкрутите один 2,8-миллиметровый винт, крепящий карту Wi-Fi к материнской плате.

Шаг 18

Lenovo ThinkPad T480s Power Button Board Replacement: step 18, image 1 of 3Lenovo ThinkPad T480s Power Button Board Replacement: step 18, image 2 of 3Lenovo ThinkPad T480s Power Button Board Replacement: step 18, image 3 of 3

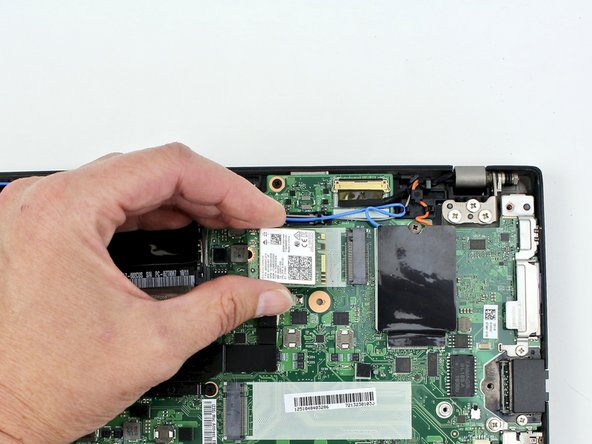
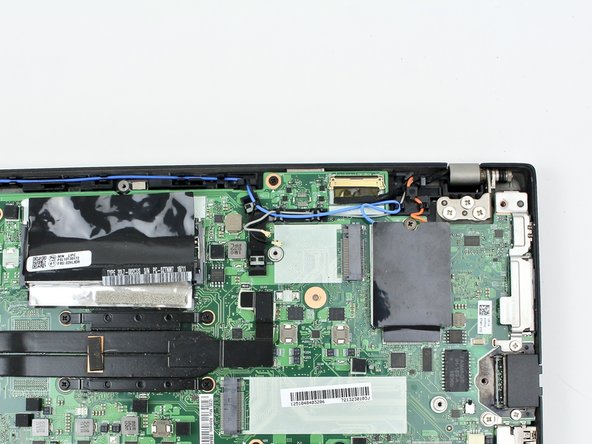
Выдвиньте карту Wi-Fi из слота.

Шаг 19 Карта WWAN

Lenovo ThinkPad T480s Power Button Board Replacement, WWAN Card: step 19, image 1 of 3Lenovo ThinkPad T480s Power Button Board Replacement, WWAN Card: step 19, image 2 of 3Lenovo ThinkPad T480s Power Button Board Replacement, WWAN Card: step 19, image 3 of 3

Откиньте картонную крышку с карты WWAN.

С помощью пассатижей отсоедините коаксиальные провода антенны от карты WWAN.

При сборке подключите синий провод слева и оранжевый провод справа.

Шаг 20

Lenovo ThinkPad T480s Power Button Board Replacement: step 20, image 1 of 2Lenovo ThinkPad T480s Power Button Board Replacement: step 20, image 2 of 2

С помощью отвертки Phillips #1 выкрутите один винт 2,8 мм.

Шаг 21

Lenovo ThinkPad T480s Power Button Board Replacement: step 21, image 1 of 3Lenovo ThinkPad T480s Power Button Board Replacement: step 21, image 2 of 3Lenovo ThinkPad T480s Power Button Board Replacement: step 21, image 3 of 3

Выдвиньте карту WWAN из слота.

Шаг 22 Сборка вентилятора

Lenovo ThinkPad T480s Power Button Board Replacement, Fan Assembly: step 22, image 1 of 2Lenovo ThinkPad T480s Power Button Board Replacement, Fan Assembly: step 22, image 2 of 2

С помощью пассатижей отсоедините кабель вентилятора от материнской платы.

Шаг 23

Lenovo ThinkPad T480s Power Button Board Replacement: step 23, image 1 of 2Lenovo ThinkPad T480s Power Button Board Replacement: step 23, image 2 of 2

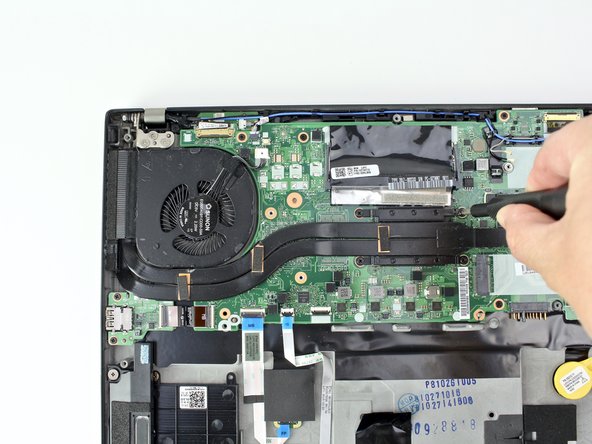
Открутите шесть невыпадающих винтов, крепящих блок вентилятора к материнской плате.

В данной системе не хватало двух винтов возле вентилятора, но я выделил их, чтобы показать, где они расположены.

Шаг 24

Lenovo ThinkPad T480s Power Button Board Replacement: step 24, image 1 of 3Lenovo ThinkPad T480s Power Button Board Replacement: step 24, image 2 of 3Lenovo ThinkPad T480s Power Button Board Replacement: step 24, image 3 of 3

Приподнимите блок вентилятора и извлеките его из системы.

Шаг 25 Лоток для SIM-карты

Lenovo ThinkPad T480s Power Button Board Replacement, SIM Card Tray: step 25, image 1 of 2Lenovo ThinkPad T480s Power Button Board Replacement, SIM Card Tray: step 25, image 2 of 2

Вставьте насадку для извлечения SIM-карты или скрепку в отверстие лотка SIM-карты, чтобы извлечь ее.

Извлеките лоток SIM-карты.

Шаг 26 Материнская плата

Lenovo ThinkPad T480s Power Button Board Replacement, Motherboard: step 26, image 1 of 3Lenovo ThinkPad T480s Power Button Board Replacement, Motherboard: step 26, image 2 of 3Lenovo ThinkPad T480s Power Button Board Replacement, Motherboard: step 26, image 3 of 3

С помощью пробки отсоедините кабель ЖК-дисплея от материнской платы.

Шаг 27

Lenovo ThinkPad T480s Power Button Board Replacement: step 27, image 1 of 3Lenovo ThinkPad T480s Power Button Board Replacement: step 27, image 2 of 3Lenovo ThinkPad T480s Power Button Board Replacement: step 27, image 3 of 3

С помощью пробки отсоедините кабель камеры от материнской платы.

Шаг 28

Lenovo ThinkPad T480s Power Button Board Replacement: step 28, image 1 of 3Lenovo ThinkPad T480s Power Button Board Replacement: step 28, image 2 of 3Lenovo ThinkPad T480s Power Button Board Replacement: step 28, image 3 of 3

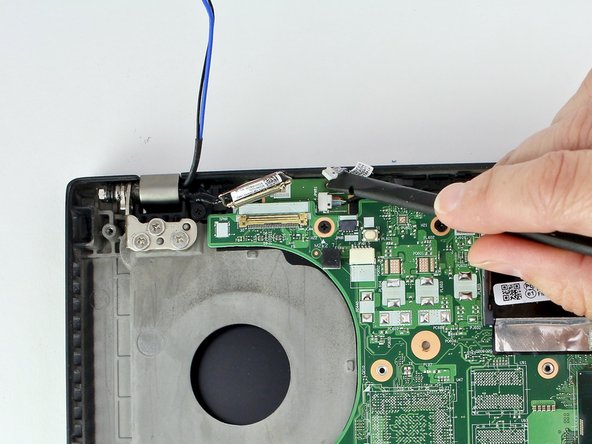
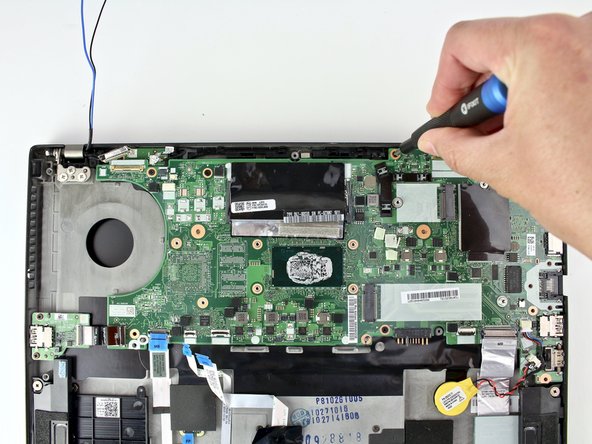
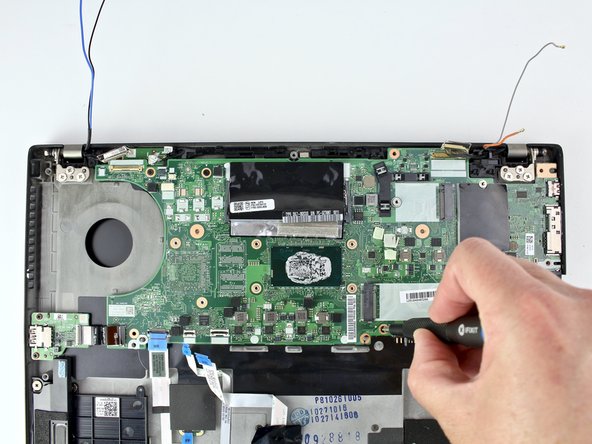
Отсоедините все кабели антенн от своих кабелей.

Шаг 29

Lenovo ThinkPad T480s Power Button Board Replacement: step 29, image 1 of 3Lenovo ThinkPad T480s Power Button Board Replacement: step 29, image 2 of 3Lenovo ThinkPad T480s Power Button Board Replacement: step 29, image 3 of 3

С помощью пробки отсоедините кабель SD-картридера/аудиокарты от платы.

Кабель прикреплен к плате с помощью клея, поэтому его нужно будет отклеить.

Шаг 30

Lenovo ThinkPad T480s Power Button Board Replacement: step 30, image 1 of 3Lenovo ThinkPad T480s Power Button Board Replacement: step 30, image 2 of 3Lenovo ThinkPad T480s Power Button Board Replacement: step 30, image 3 of 3

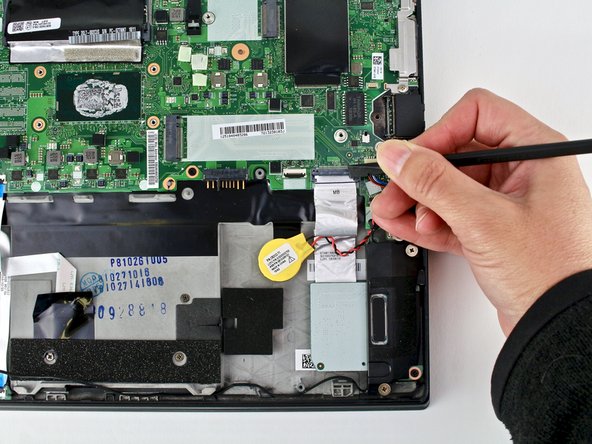
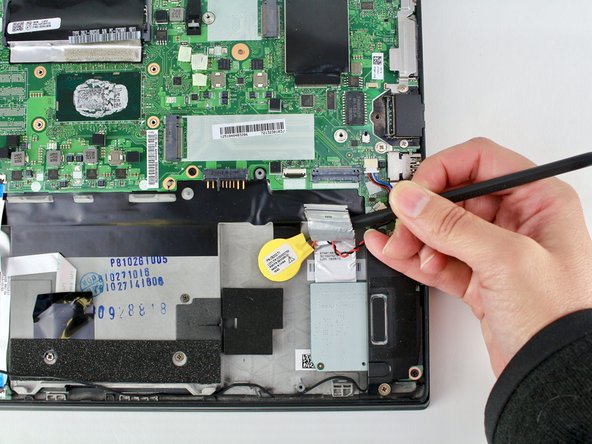
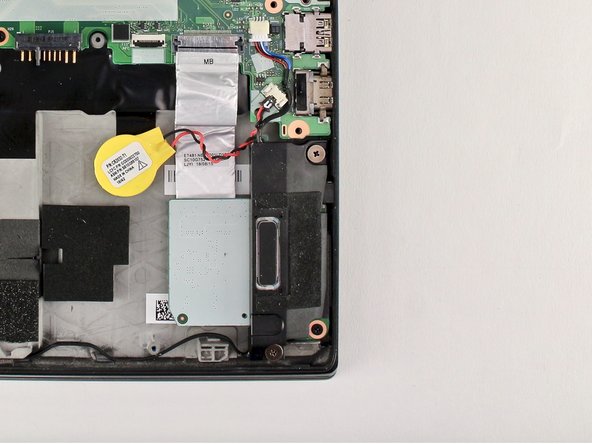
С помощью съемника разъемов или пробки отсоедините монетную батарею от платы и вытащите кабель из выемки.

Шаг 31

Lenovo ThinkPad T480s Power Button Board Replacement: step 31, image 1 of 3Lenovo ThinkPad T480s Power Button Board Replacement: step 31, image 2 of 3Lenovo ThinkPad T480s Power Button Board Replacement: step 31, image 3 of 3

С помощью пробки отсоедините кабель трекпада, кабель датчика Холла и кабель считывателя смарт-карт от материнской платы.

Шаг 32

Lenovo ThinkPad T480s Power Button Board Replacement: step 32, image 1 of 3Lenovo ThinkPad T480s Power Button Board Replacement: step 32, image 2 of 3Lenovo ThinkPad T480s Power Button Board Replacement: step 32, image 3 of 3

Отсоедините кабель USB-карты от материнской платы с помощью пробки.

Шаг 33

Lenovo ThinkPad T480s Power Button Board Replacement: step 33, image 1 of 2Lenovo ThinkPad T480s Power Button Board Replacement: step 33, image 2 of 2

С помощью пробки отсоедините кабель кнопки питания от материнской платы.

Шаг 34

Lenovo ThinkPad T480s Power Button Board Replacement: step 34, image 1 of 2Lenovo ThinkPad T480s Power Button Board Replacement: step 34, image 2 of 2

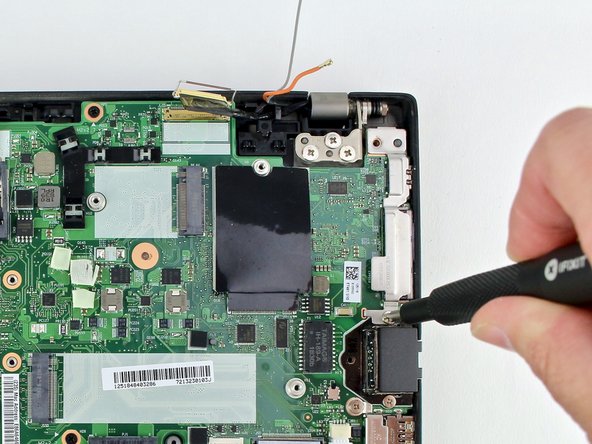
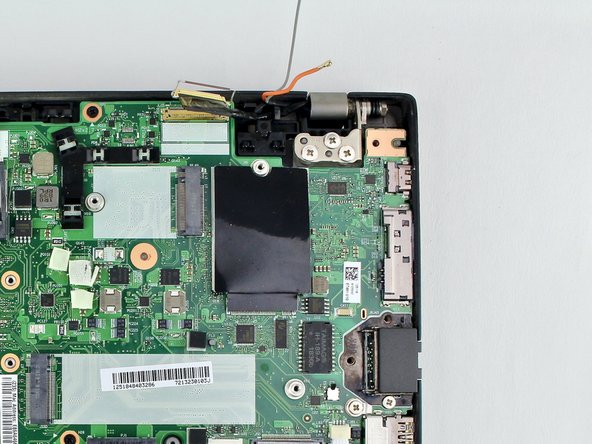
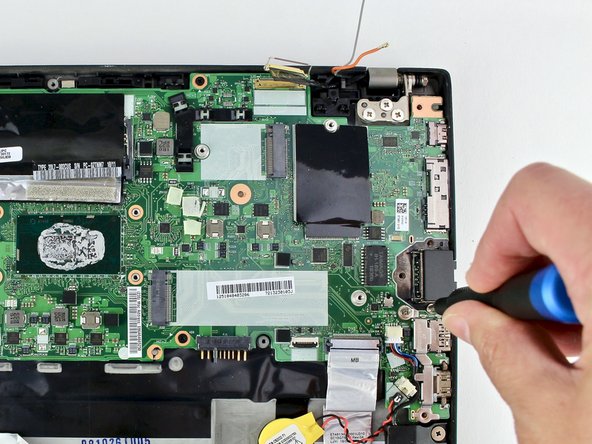
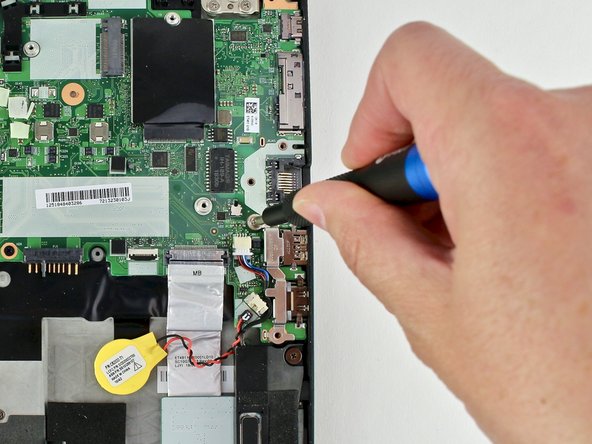
С помощью отвертки Phillips #1 выкрутите винт 4,6 мм из кронштейна USB-C.

Шаг 35

Lenovo ThinkPad T480s Power Button Board Replacement: step 35, image 1 of 2Lenovo ThinkPad T480s Power Button Board Replacement: step 35, image 2 of 2

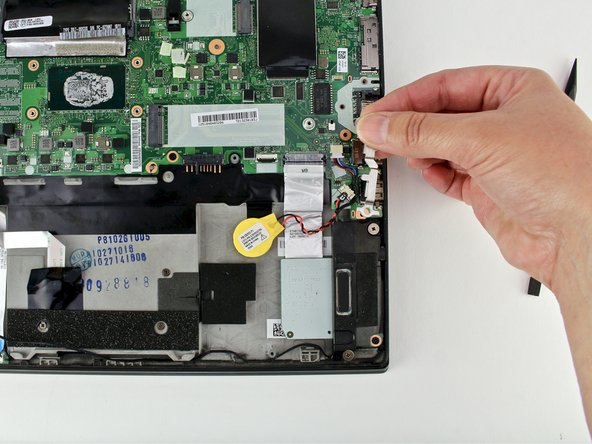
Поднимите кронштейн USB-C из системы.

Шаг 36

Lenovo ThinkPad T480s Power Button Board Replacement: step 36, image 1 of 2Lenovo ThinkPad T480s Power Button Board Replacement: step 36, image 2 of 2

С помощью отвертки Phillips #1 выкрутите винт 4,7 мм из дверцы ловушки.

Шаг 37

Lenovo ThinkPad T480s Power Button Board Replacement: step 37, image 1 of 2Lenovo ThinkPad T480s Power Button Board Replacement: step 37, image 2 of 2

Поднимите дверцу ловушки.

Шаг 38

Lenovo ThinkPad T480s Power Button Board Replacement: step 38, image 1 of 2Lenovo ThinkPad T480s Power Button Board Replacement: step 38, image 2 of 2

Выкрутите винт 4,4 мм из кронштейна HDMI с помощью отвертки Phillips #1.

Шаг 39

Lenovo ThinkPad T480s Power Button Board Replacement: step 39, image 1 of 3Lenovo ThinkPad T480s Power Button Board Replacement: step 39, image 2 of 3Lenovo ThinkPad T480s Power Button Board Replacement: step 39, image 3 of 3

Снимите кронштейн HDMI с материнской платы с помощью пальцев.

Шаг 40

Lenovo ThinkPad T480s Power Button Board Replacement: step 40, image 1 of 3Lenovo ThinkPad T480s Power Button Board Replacement: step 40, image 2 of 3Lenovo ThinkPad T480s Power Button Board Replacement: step 40, image 3 of 3

С помощью отвертки Phillips #1 открутите четыре винта 3,1 мм с материнской платы.

Шаг 41

Lenovo ThinkPad T480s Power Button Board Replacement: step 41, image 1 of 2Lenovo ThinkPad T480s Power Button Board Replacement: step 41, image 2 of 2

Поднимите материнскую плату с шасси, чтобы извлечь ее из устройства.

Шаг 42 Плата кнопки питания

Lenovo ThinkPad T480s Power Button Board Replacement, Power Button Board: step 42, image 1 of 2Lenovo ThinkPad T480s Power Button Board Replacement, Power Button Board: step 42, image 2 of 2

С помощью отвертки Phillips #1 выкрутите из платы винт диаметром 3 мм.

Шаг 43

Lenovo ThinkPad T480s Power Button Board Replacement: step 43, image 1 of 2Lenovo ThinkPad T480s Power Button Board Replacement: step 43, image 2 of 2

Пальцами извлеките плату кнопок питания из системы.

Комментировать
82 просмотров
Комментариев нет, будьте первым кто его оставит

Это интересно
No Image Гайды
0 комментариев
No Image Гайды
0 комментариев
No Image Гайды
0 комментариев