No Image

Как снять переднюю панель в стиральной машине LG WM3050CW

СОДЕРЖАНИЕ
63 просмотров
17 декабря 2023

Введение

Используйте это руководство, чтобы снять переднюю панель в стиральной машине LG WM3050CW.

Сняв переднюю панель, вы получите доступ к узлу сливного насоса, а также к сливной трубке.

Металлическое кольцо, удерживающее резиновый сапог, может быть трудно установить на место. Вы можете приобрести этот инструмент, чтобы облегчить переустановку, или попросить других людей помочь.

Шаг 1 Меры предосторожности

How to Remove the Front Panel in Your LG WM3050CW Washing Machine, Safety Precautions: step 1, image 1 of 2How to Remove the Front Panel in Your LG WM3050CW Washing Machine, Safety Precautions: step 1, image 2 of 2

Прежде чем приступить к ремонту, выполните следующие действия:

Отключите основное водоснабжение

Отключите стиральную машину от сети

Отсоедините все водопроводные соединения на задней панели стиральной машины

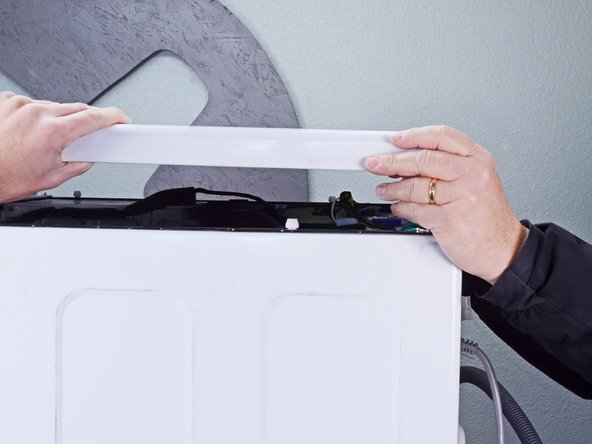
Шаг 2 Снимите верхнюю панель

How to Remove the Front Panel in Your LG WM3050CW Washing Machine, Unfasten the top panel: step 2, image 1 of 3How to Remove the Front Panel in Your LG WM3050CW Washing Machine, Unfasten the top panel: step 2, image 2 of 3How to Remove the Front Panel in Your LG WM3050CW Washing Machine, Unfasten the top panel: step 2, image 3 of 3

С помощью крестообразной отвертки выкрутите два нижних винта длиной 16,5 мм, крепящих кронштейны верхней панели.

Шаг 3 Снимите верхнюю панель

How to Remove the Front Panel in Your LG WM3050CW Washing Machine, Remove the top panel: step 3, image 1 of 2How to Remove the Front Panel in Your LG WM3050CW Washing Machine, Remove the top panel: step 3, image 2 of 2

Сдвиньте верхнюю панель на 1-2 дюйма в сторону задней части устройства, чтобы отсоединить ее зажимы.

Шаг 4

How to Remove the Front Panel in Your LG WM3050CW Washing Machine: step 4, image 1 of 2How to Remove the Front Panel in Your LG WM3050CW Washing Machine: step 4, image 2 of 2

Наклоните верхнюю панель вверх, чтобы полностью отсоединить ее от корпуса.

Снимите верхнюю панель.

Шаг 5 Извлеките ящик для моющих средств

How to Remove the Front Panel in Your LG WM3050CW Washing Machine, Remove the detergent drawer: step 5, image 1 of 2How to Remove the Front Panel in Your LG WM3050CW Washing Machine, Remove the detergent drawer: step 5, image 2 of 2

Потяните ящик для моющих средств в сторону от корпуса до упора.

Шаг 6

How to Remove the Front Panel in Your LG WM3050CW Washing Machine: step 6, image 1 of 3How to Remove the Front Panel in Your LG WM3050CW Washing Machine: step 6, image 2 of 3How to Remove the Front Panel in Your LG WM3050CW Washing Machine: step 6, image 3 of 3

Нажмите на кнопку «Push», чтобы отсоединить зажимы, фиксирующие ящик для моющих средств.

Вытащите ящик из своего гнезда на корпусе и снимите его.

Шаг 7 Отсоедините панель управления

How to Remove the Front Panel in Your LG WM3050CW Washing Machine, Disconnect the control panel: step 7, image 1 of 3How to Remove the Front Panel in Your LG WM3050CW Washing Machine, Disconnect the control panel: step 7, image 2 of 3How to Remove the Front Panel in Your LG WM3050CW Washing Machine, Disconnect the control panel: step 7, image 3 of 3

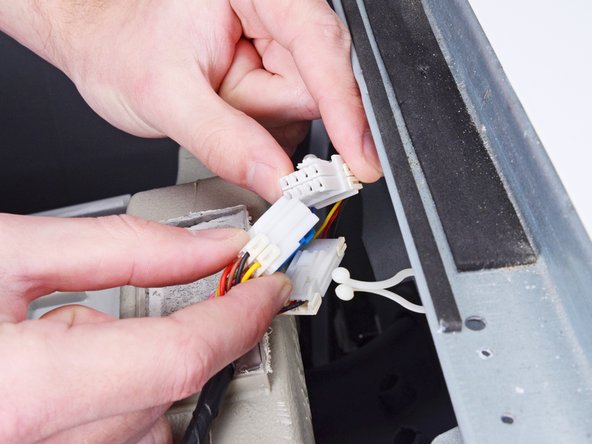
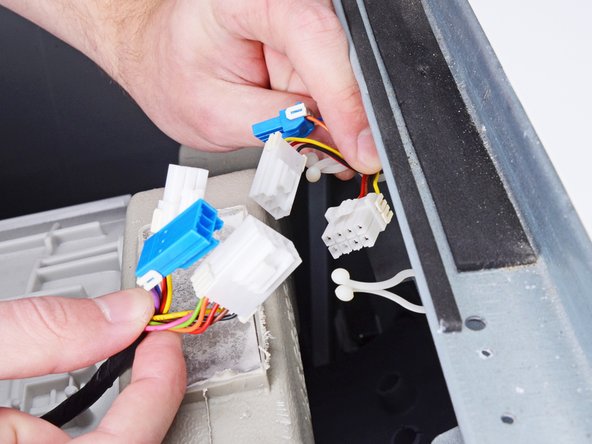
Отсоедините три разъема жгута проводов панели управления.

Всегда берите кабели за их разъемы, а не за сами провода.

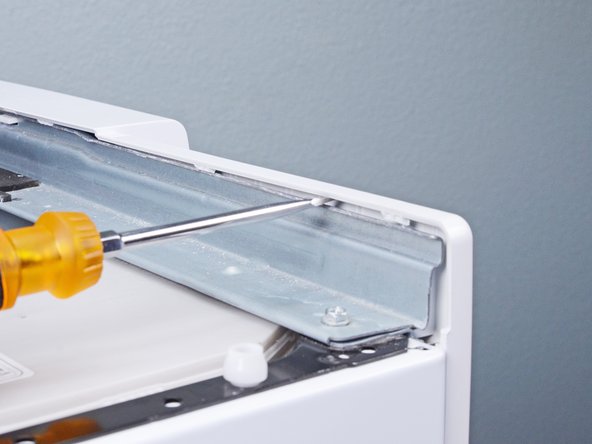
Шаг 8 Отсоедините панель управления

How to Remove the Front Panel in Your LG WM3050CW Washing Machine, Unfasten the control panel: step 8, image 1 of 2How to Remove the Front Panel in Your LG WM3050CW Washing Machine, Unfasten the control panel: step 8, image 2 of 2

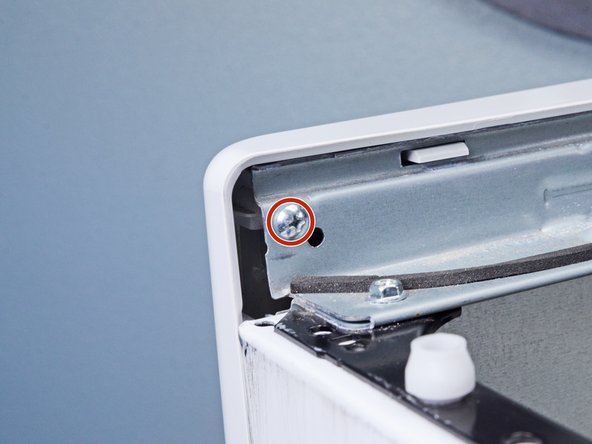
С помощью крестообразного ключа выкрутите винт длиной 16,4 мм, крепящий панель управления.

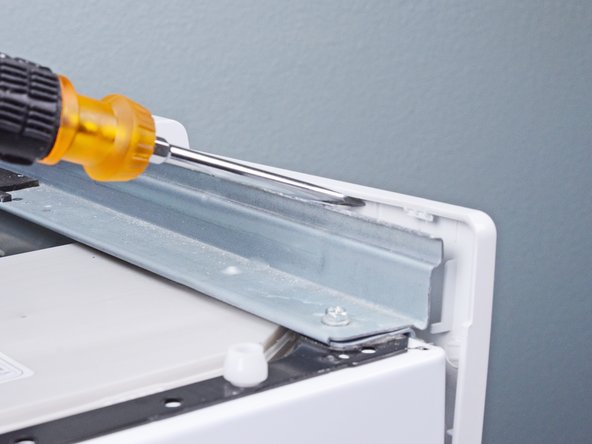
Шаг 9 Открепите дозатор моющих средств

How to Remove the Front Panel in Your LG WM3050CW Washing Machine, Unfasten the detergent dispenser: step 9, image 1 of 1

С помощью крестообразного ключа выверните два винта длиной 26,3 мм, крепящие дозатор моющих средств.

Шаг 10 Отсоедините панель управления

How to Remove the Front Panel in Your LG WM3050CW Washing Machine, Unclip the control panel: step 10, image 1 of 3How to Remove the Front Panel in Your LG WM3050CW Washing Machine, Unclip the control panel: step 10, image 2 of 3How to Remove the Front Panel in Your LG WM3050CW Washing Machine, Unclip the control panel: step 10, image 3 of 3

Вставьте плоскую отвертку между корпусом и верхним левым углом панели управления.

Поверните отвертку, чтобы освободить зажимы, фиксирующие панель управления.

Повторите эту процедуру для остальных зажимов на панели управления.

Шаг 11 Снимите панель управления

How to Remove the Front Panel in Your LG WM3050CW Washing Machine, Remove the control panel: step 11, image 1 of 3How to Remove the Front Panel in Your LG WM3050CW Washing Machine, Remove the control panel: step 11, image 2 of 3How to Remove the Front Panel in Your LG WM3050CW Washing Machine, Remove the control panel: step 11, image 3 of 3

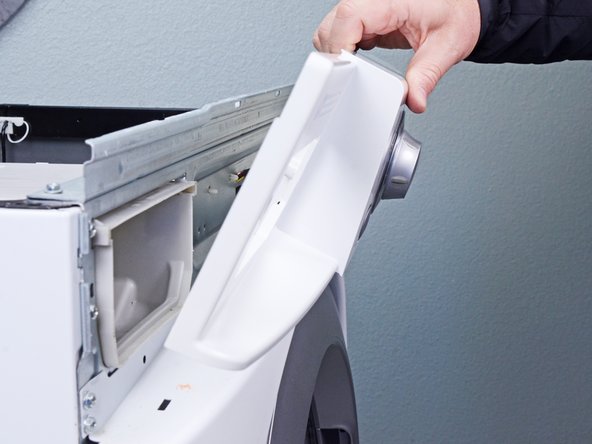
Поднимите панель управления вверх, чтобы полностью отделить ее от корпуса.

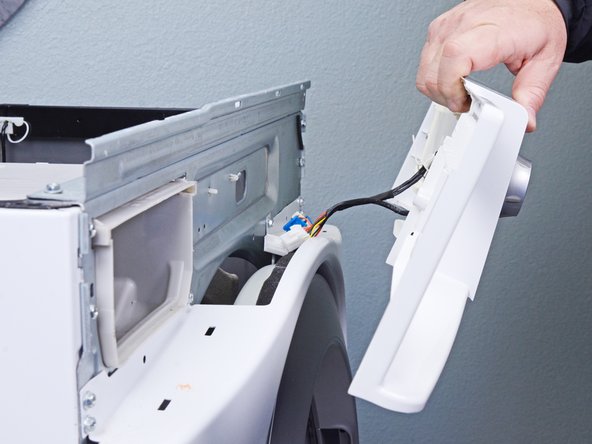
Потяните панель управления в сторону от шасси, следя за тем, чтобы пропустить кабели через прорезь в шасси.

Снимите панель управления.

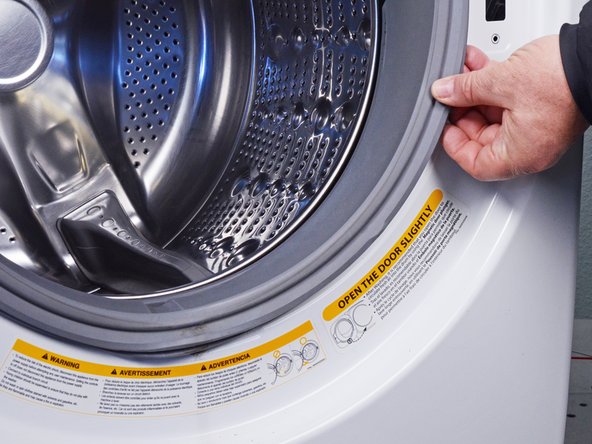
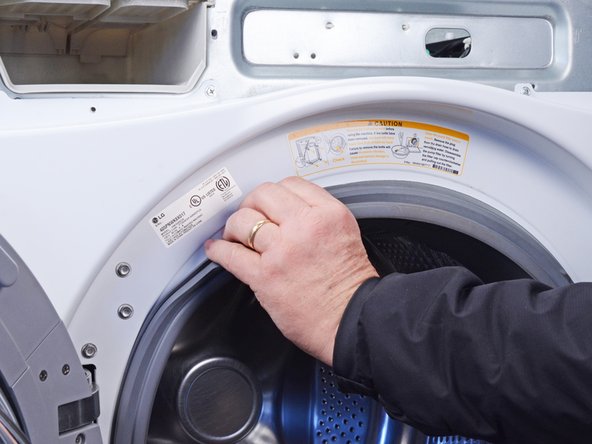
Шаг 12 Откройте дверцу

How to Remove the Front Panel in Your LG WM3050CW Washing Machine, Open the door: step 12, image 1 of 2How to Remove the Front Panel in Your LG WM3050CW Washing Machine, Open the door: step 12, image 2 of 2

Полностью откройте переднюю дверцу.

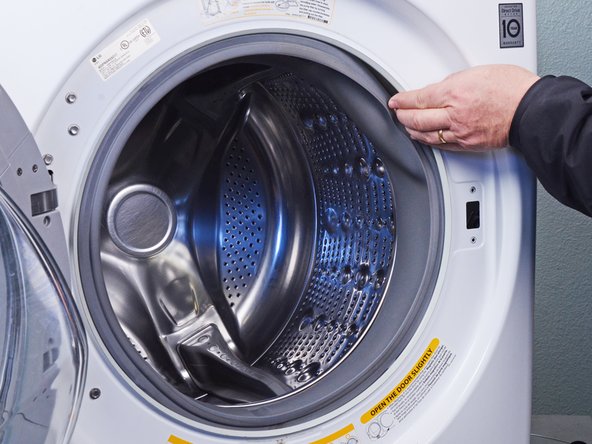
Шаг 13 Снимите загрузочное кольцо

How to Remove the Front Panel in Your LG WM3050CW Washing Machine, Remove the boot ring: step 13, image 1 of 3How to Remove the Front Panel in Your LG WM3050CW Washing Machine, Remove the boot ring: step 13, image 2 of 3How to Remove the Front Panel in Your LG WM3050CW Washing Machine, Remove the boot ring: step 13, image 3 of 3

С помощью игольчатых плоскогубцев возьмитесь за пружинный конец металлического кольца в нижней части резинового сапожка.

Потяните кольцо в сторону от шасси, чтобы отделить его от багажника.

Шаг 14

How to Remove the Front Panel in Your LG WM3050CW Washing Machine: step 14, image 1 of 3How to Remove the Front Panel in Your LG WM3050CW Washing Machine: step 14, image 2 of 3How to Remove the Front Panel in Your LG WM3050CW Washing Machine: step 14, image 3 of 3

Рукой полностью снимите кольцо с багажника.

При сборке выполните следующие действия:

Вставьте один конец кольца в паз по периметру багажника.

С помощью плоскогубцев медленно растягивайте кольцо по периметру багажника, пока оно полностью не войдет в свою канавку.

Для этой процедуры потребуется значительное усилие.

Шаг 15 Отсоедините багажник

How to Remove the Front Panel in Your LG WM3050CW Washing Machine, Disconnect the boot: step 15, image 1 of 3How to Remove the Front Panel in Your LG WM3050CW Washing Machine, Disconnect the boot: step 15, image 2 of 3How to Remove the Front Panel in Your LG WM3050CW Washing Machine, Disconnect the boot: step 15, image 3 of 3

Пальцами отсоедините багажник от выступа на передней панели.

Шаг 16

How to Remove the Front Panel in Your LG WM3050CW Washing Machine: step 16, image 1 of 3How to Remove the Front Panel in Your LG WM3050CW Washing Machine: step 16, image 2 of 3How to Remove the Front Panel in Your LG WM3050CW Washing Machine: step 16, image 3 of 3

Проведите пальцами вокруг багажника, пока он полностью не отделится от панели.

Шаг 17 Снимите панель фильтра

How to Remove the Front Panel in Your LG WM3050CW Washing Machine, Remove the filter panel: step 17, image 1 of 3How to Remove the Front Panel in Your LG WM3050CW Washing Machine, Remove the filter panel: step 17, image 2 of 3How to Remove the Front Panel in Your LG WM3050CW Washing Machine, Remove the filter panel: step 17, image 3 of 3

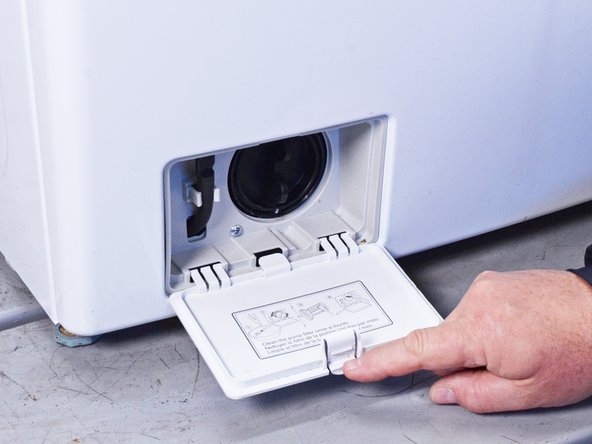
Откройте панель фильтра в левой нижней части передней панели.

Поверните панель фильтра вверх, чтобы отсоединить ее от передней панели.

Шаг 18 Открепите обшивку фильтра

How to Remove the Front Panel in Your LG WM3050CW Washing Machine, Unfasten the filter trim: step 18, image 1 of 1

С помощью крестообразной отвертки выкрутите два винта длиной 12,8 мм, крепящих отделку фильтра.

Шаг 19 Снимите отделку фильтра

How to Remove the Front Panel in Your LG WM3050CW Washing Machine, Remove the filter trim: step 19, image 1 of 2How to Remove the Front Panel in Your LG WM3050CW Washing Machine, Remove the filter trim: step 19, image 2 of 2

Потяните обшивку фильтра прямо на себя, чтобы снять ее с передней панели.

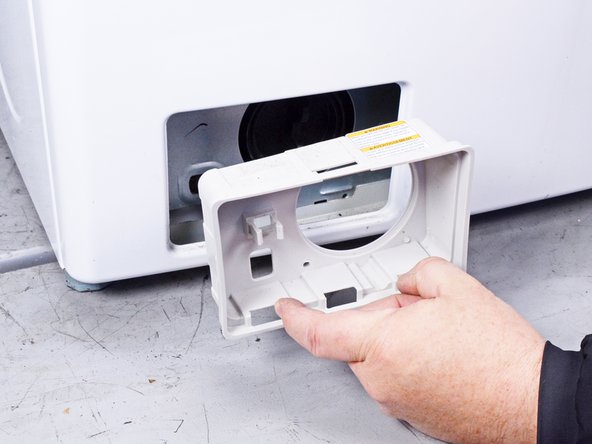
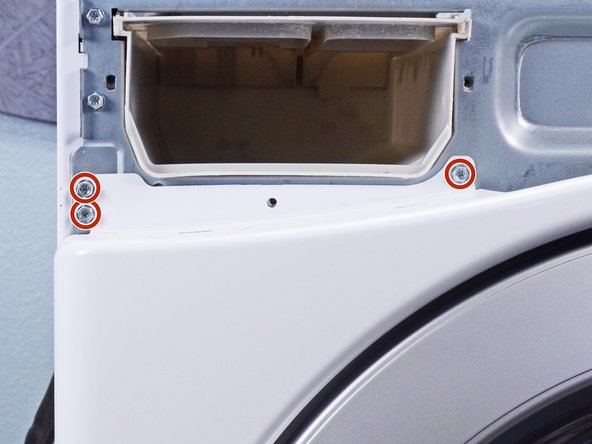
Шаг 20 Открепите нижнюю переднюю панель

How to Remove the Front Panel in Your LG WM3050CW Washing Machine, Unfasten the lower front panel: step 20, image 1 of 1

С помощью крестообразного ключа выкрутите винт длиной 12,8 мм, крепящий нижнюю переднюю панель.

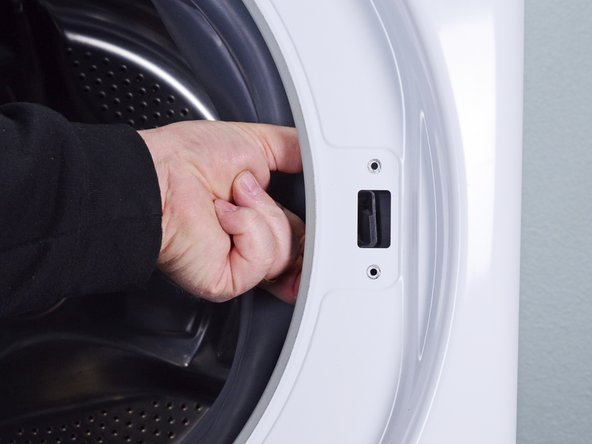
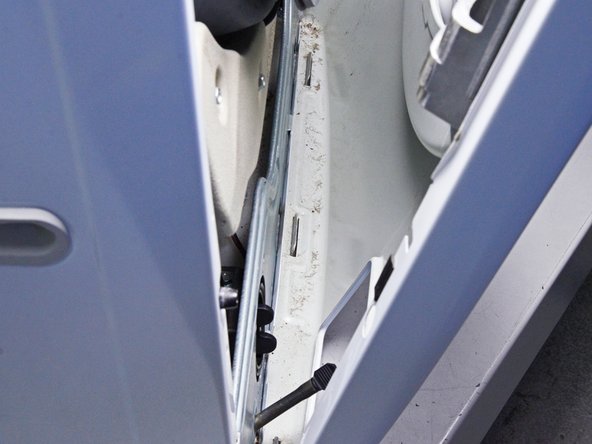
Шаг 21 Открепите защелку дверцы

How to Remove the Front Panel in Your LG WM3050CW Washing Machine, Unfasten the door latch: step 21, image 1 of 1

С помощью крестообразной отвертки выверните два винта длиной 16 мм, крепящие дверную защелку.

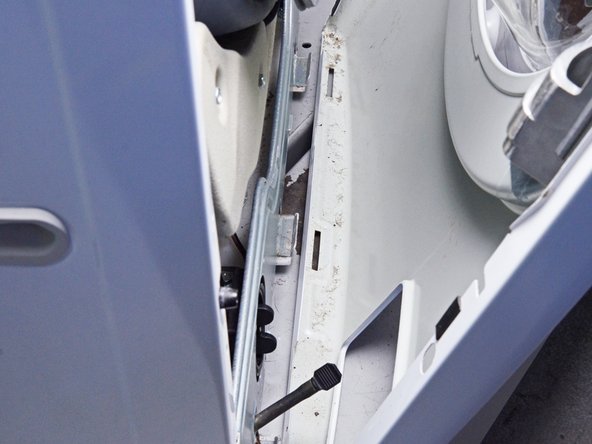
Шаг 22 Снимите дверную защелку

How to Remove the Front Panel in Your LG WM3050CW Washing Machine, Remove the door latch: step 22, image 1 of 3How to Remove the Front Panel in Your LG WM3050CW Washing Machine, Remove the door latch: step 22, image 2 of 3How to Remove the Front Panel in Your LG WM3050CW Washing Machine, Remove the door latch: step 22, image 3 of 3

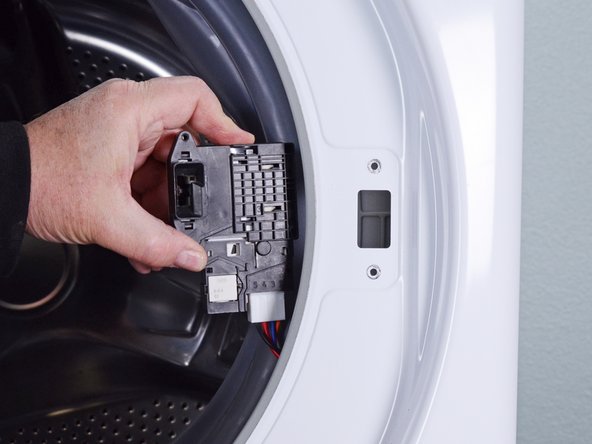
Протяните дверную защелку через паз в корпусе и оставьте ее висеть на проводе.

Шаг 23 Снимите переднюю панель

How to Remove the Front Panel in Your LG WM3050CW Washing Machine, Unfasten the front panel: step 23, image 1 of 3How to Remove the Front Panel in Your LG WM3050CW Washing Machine, Unfasten the front panel: step 23, image 2 of 3How to Remove the Front Panel in Your LG WM3050CW Washing Machine, Unfasten the front panel: step 23, image 3 of 3

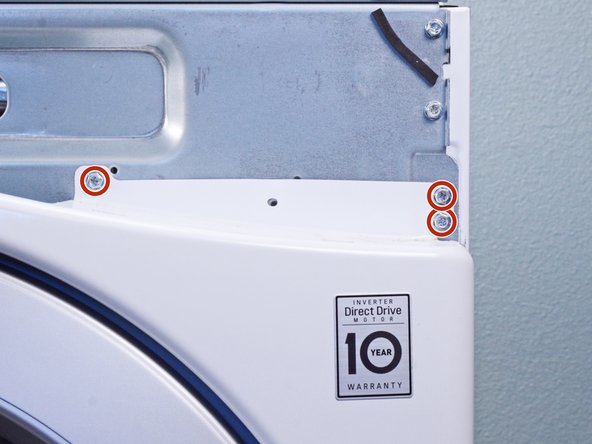
Во время выполнения этого шага придерживайте переднюю панель за шасси, чтобы она не упала.

С помощью крестообразного ключа или гаечного ключа на 7 мм открутите шесть винтов длиной 15 мм, крепящих переднюю панель.

Шаг 24 Снимите переднюю панель

How to Remove the Front Panel in Your LG WM3050CW Washing Machine, Remove the front panel: step 24, image 1 of 3How to Remove the Front Panel in Your LG WM3050CW Washing Machine, Remove the front panel: step 24, image 2 of 3How to Remove the Front Panel in Your LG WM3050CW Washing Machine, Remove the front panel: step 24, image 3 of 3

Поднимите переднюю панель вверх, чтобы отделить ее от фиксаторов на нижней части корпуса.

Потяните переднюю панель в сторону от шасси, чтобы полностью отделить ее.

Шаг 25

How to Remove the Front Panel in Your LG WM3050CW Washing Machine: step 25, image 1 of 1

Снимите переднюю панель.

Комментировать
63 просмотров
Комментариев нет, будьте первым кто его оставит

Это интересно
No Image Гайды
0 комментариев
No Image Гайды
0 комментариев
No Image Гайды
0 комментариев