No Image

Замена узла регулировки давления в безвоздушном распылителе Titan IMPACT 410

СОДЕРЖАНИЕ
107 просмотров
12 декабря 2023

Введение

Используйте это руководство для замены узла регулировки давления в безвоздушном распылителе Titan Impact 410.

Шаг 1 Меры предосторожности

Titan Airless Sprayer IMPACT 410 Pressure Adjustment Assembly Replacement, Safety precautions: step 1, image 1 of 2Titan Airless Sprayer IMPACT 410 Pressure Adjustment Assembly Replacement, Safety precautions: step 1, image 2 of 2

Перед началом работы обязательно выполните процедуру сброса давления, описанную в руководстве пользователя, прежде чем отключить питание краскораспылителя и отсоединить насос.

Выключите и отсоедините краскораспылитель от сети.

Шаг 2 Открепите блок управления двигателем

Titan Airless Sprayer IMPACT 410 Pressure Adjustment Assembly Replacement, Unfasten the motor controller assembly: step 2, image 1 of 2Titan Airless Sprayer IMPACT 410 Pressure Adjustment Assembly Replacement, Unfasten the motor controller assembly: step 2, image 2 of 2

С помощью крестообразной отвертки выкрутите четыре винта длиной 12 мм, крепящие блок контроллера двигателя.

Шаг 3 Установите блок управления двигателем на место

Titan Airless Sprayer IMPACT 410 Pressure Adjustment Assembly Replacement, Reposition the motor controller assembly: step 3, image 1 of 3Titan Airless Sprayer IMPACT 410 Pressure Adjustment Assembly Replacement, Reposition the motor controller assembly: step 3, image 2 of 3Titan Airless Sprayer IMPACT 410 Pressure Adjustment Assembly Replacement, Reposition the motor controller assembly: step 3, image 3 of 3

Не пытайтесь снять блок управления двигателем полностью, так как он соединен с корпусом с помощью кабелей.

Потяните блок контроллера двигателя и отведите его в сторону, обнажив кабели.

Шаг 4 Отсоедините лопаточные разъемы

Titan Airless Sprayer IMPACT 410 Pressure Adjustment Assembly Replacement, Disconnect the spade connectors: step 4, image 1 of 2Titan Airless Sprayer IMPACT 410 Pressure Adjustment Assembly Replacement, Disconnect the spade connectors: step 4, image 2 of 2

С помощью игольчатых плоскогубцев или пальцев отсоедините два разъема-лопатки от выключателя.

Отсоедините один лопаточный разъем на выключателе.

Обратите внимание на порядок расположения кабелей и их разъемов, чтобы облегчить сборку.

Шаг 5

Titan Airless Sprayer IMPACT 410 Pressure Adjustment Assembly Replacement: step 5, image 1 of 2Titan Airless Sprayer IMPACT 410 Pressure Adjustment Assembly Replacement: step 5, image 2 of 2

Отсоедините оставшийся лопаточный разъем от выключателя.

Отсоедините пиковый разъем перемычки от выключателя включения/выключения и автоматического выключателя.

Черный кабель-перемычка с темно-синими разъемами не присоединен к остальным частям сборки.

Обратите внимание на порядок расположения кабелей и их разъемов, чтобы облегчить сборку.

Шаг 6 Снимите автоматический выключатель

Titan Airless Sprayer IMPACT 410 Pressure Adjustment Assembly Replacement, Remove the circuit breaker: step 6, image 1 of 2Titan Airless Sprayer IMPACT 410 Pressure Adjustment Assembly Replacement, Remove the circuit breaker: step 6, image 2 of 2

Пальцами открутите и снимите гайку автоматического выключателя.

Снимите автоматический выключатель.

Шаг 7 Снимите переключатель включения/выключения

Titan Airless Sprayer IMPACT 410 Pressure Adjustment Assembly Replacement, Remove the on/off switch: step 7, image 1 of 3Titan Airless Sprayer IMPACT 410 Pressure Adjustment Assembly Replacement, Remove the on/off switch: step 7, image 2 of 3Titan Airless Sprayer IMPACT 410 Pressure Adjustment Assembly Replacement, Remove the on/off switch: step 7, image 3 of 3

С помощью плоской отвертки нажмите на фиксирующие выступы, расположенные сверху и снизу выключателя.

Нажимая на выступы, вытолкните выключатель через вырез.

Снимите выключатель.

Шаг 8 Открепите контактный переключатель

Titan Airless Sprayer IMPACT 410 Pressure Adjustment Assembly Replacement, Unfasten the contact switch: step 8, image 1 of 2Titan Airless Sprayer IMPACT 410 Pressure Adjustment Assembly Replacement, Unfasten the contact switch: step 8, image 2 of 2

С помощью крестообразной отвертки выкрутите два винта длиной 17 мм, крепящих контактный переключатель.

Шаг 9 Измените положение контактного переключателя

Titan Airless Sprayer IMPACT 410 Pressure Adjustment Assembly Replacement, Reposition the contact switch: step 9, image 1 of 1

Потяните контактный переключатель от плунжера и положите его на пол корпуса.

Шаг 10 Снимите стопорное кольцо

Titan Airless Sprayer IMPACT 410 Pressure Adjustment Assembly Replacement, Remove the retaining ring: step 10, image 1 of 2Titan Airless Sprayer IMPACT 410 Pressure Adjustment Assembly Replacement, Remove the retaining ring: step 10, image 2 of 2

С помощью плоскогубцев снимите стопорное кольцо с верхней части плунжера.

При сборке установите новое кольцо плоской стороной вниз.

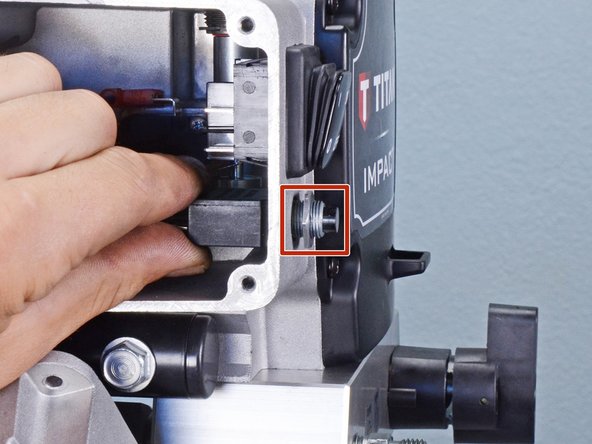
Шаг 11 Снимите ручку управления

Titan Airless Sprayer IMPACT 410 Pressure Adjustment Assembly Replacement, Remove the control knob: step 11, image 1 of 3Titan Airless Sprayer IMPACT 410 Pressure Adjustment Assembly Replacement, Remove the control knob: step 11, image 2 of 3Titan Airless Sprayer IMPACT 410 Pressure Adjustment Assembly Replacement, Remove the control knob: step 11, image 3 of 3

Ослабьте ручку управления давлением.

Снимите ручку управления давлением.

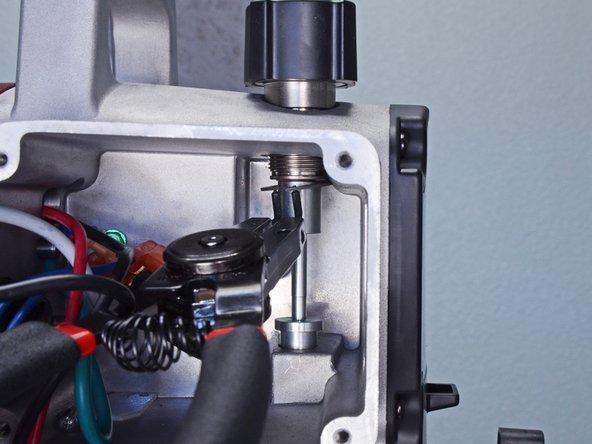
Шаг 12 Снимите пружину регулировки давления

Titan Airless Sprayer IMPACT 410 Pressure Adjustment Assembly Replacement, Remove the pressure adjustment spring: step 12, image 1 of 2Titan Airless Sprayer IMPACT 410 Pressure Adjustment Assembly Replacement, Remove the pressure adjustment spring: step 12, image 2 of 2

Снимите пружину регулировки давления.

Шаг 13 Снимите плунжер

Titan Airless Sprayer IMPACT 410 Pressure Adjustment Assembly Replacement, Remove the plunger: step 13, image 1 of 2Titan Airless Sprayer IMPACT 410 Pressure Adjustment Assembly Replacement, Remove the plunger: step 13, image 2 of 2

Снимите плунжер.

Комментировать
107 просмотров
Комментариев нет, будьте первым кто его оставит

Это интересно
No Image Гайды
0 комментариев
No Image Гайды
0 комментариев
No Image Гайды
0 комментариев