No Image

Замена радиатора и термопасты Dell Inspiron n5110

90 просмотров
17 декабря 2023

Введение

Если ваш ноутбук перегревается, вы должны открыть его и почистить радиатор. В этом видео вы узнаете, как это сделать.

Пожалуйста, ПОДПИСЫВАЙТЕСЬ на мой канал ツ

Шаг 1 Чистка системы радиатора / замена термопасты

Dell Inspiron n5110 heat sink and thermal paste replacement, Heat Sink System Cleaning / Thermal Paste Replacing: step 1, image 1 of 3Dell Inspiron n5110 heat sink and thermal paste replacement, Heat Sink System Cleaning / Thermal Paste Replacing: step 1, image 2 of 3Dell Inspiron n5110 heat sink and thermal paste replacement, Heat Sink System Cleaning / Thermal Paste Replacing: step 1, image 3 of 3

Выключите ноутбук и извлеките аккумулятор.

Чтобы снять клавиатуру, приподнимите ее с одной стороны с помощью кусачек. Теперь откройте 4-кратные фиксаторы в верхней части клавиатуры.

Шаг 2

Dell Inspiron n5110 heat sink and thermal paste replacement: step 2, image 1 of 3Dell Inspiron n5110 heat sink and thermal paste replacement: step 2, image 2 of 3Dell Inspiron n5110 heat sink and thermal paste replacement: step 2, image 3 of 3

Откройте разъем гибкого кабеля клавиатуры и извлеките KB.

Откройте крышку оперативной памяти.

DVD-привод держится на одном винте. Открутив его, вы сможете извлечь привод.

Шаг 3

Dell Inspiron n5110 heat sink and thermal paste replacement: step 3, image 1 of 3Dell Inspiron n5110 heat sink and thermal paste replacement: step 3, image 2 of 3Dell Inspiron n5110 heat sink and thermal paste replacement: step 3, image 3 of 3

12x винты M 2,5×5,0

4x винта M 2,5×5,0

Разъем кабеля выключателя питания

Разъем кабеля коврика для мыши

Разъем кабеля горячих клавиш

Открутив все винты и открыв все разъемы, вы сможете снять верхний корпус.

Шаг 4

Dell Inspiron n5110 heat sink and thermal paste replacement: step 4, image 1 of 3Dell Inspiron n5110 heat sink and thermal paste replacement: step 4, image 2 of 3Dell Inspiron n5110 heat sink and thermal paste replacement: step 4, image 3 of 3

Извлеките заглушку кардридера.

Отсоедините гибкий кабель ЖК-дисплея.

Отсоедините коаксиальные кабели WiFi и Bluetooth.

Кронштейны ЖК-дисплея держатся на 4x винтах M 2,5×5.0.

Теперь можно снять модуль ЖК-дисплея.

Шаг 5

Dell Inspiron n5110 heat sink and thermal paste replacement: step 5, image 1 of 3Dell Inspiron n5110 heat sink and thermal paste replacement: step 5, image 2 of 3Dell Inspiron n5110 heat sink and thermal paste replacement: step 5, image 3 of 3

Открутите 5x винтов M2,5×5,0.

Отсоедините разъем кабеля громкоговорителей.

Снимите дочернюю плату Bluetooth.

Начните снимать материнскую плату, приподняв ее с правой стороны (рядом с разъемом DVD-привода).

Будьте осторожны, между материнской платой и еще двумя небольшими платами (платой порта зарядки и USB-разъемами, платой слота WiFi) находятся разъемы.

Шаг 6

Dell Inspiron n5110 heat sink and thermal paste replacement: step 6, image 1 of 3Dell Inspiron n5110 heat sink and thermal paste replacement: step 6, image 2 of 3Dell Inspiron n5110 heat sink and thermal paste replacement: step 6, image 3 of 3

Извлеките жесткий диск.

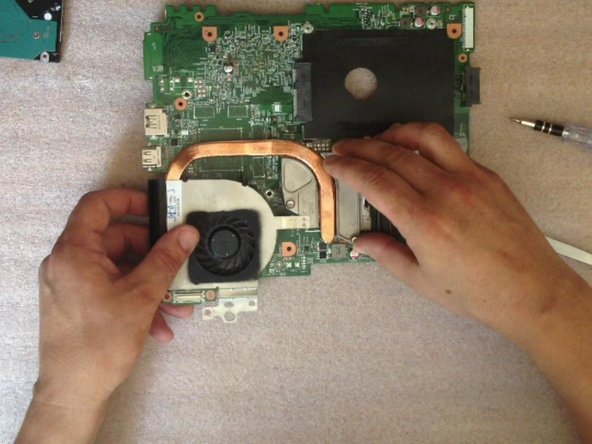
Отсоедините разъем кабеля вентилятора.

Шаг 7

Dell Inspiron n5110 heat sink and thermal paste replacement: step 7, image 1 of 3Dell Inspiron n5110 heat sink and thermal paste replacement: step 7, image 2 of 3Dell Inspiron n5110 heat sink and thermal paste replacement: step 7, image 3 of 3

Снимите радиатор.

Очистите контактную поверхность радиатора.

Шаг 8

Dell Inspiron n5110 heat sink and thermal paste replacement: step 8, image 1 of 3Dell Inspiron n5110 heat sink and thermal paste replacement: step 8, image 2 of 3Dell Inspiron n5110 heat sink and thermal paste replacement: step 8, image 3 of 3

Разберите систему радиатора, чтобы очистить вентилятор и радиатор изнутри.

Шаг 9

Dell Inspiron n5110 heat sink and thermal paste replacement: step 9, image 1 of 2Dell Inspiron n5110 heat sink and thermal paste replacement: step 9, image 2 of 2

Очистите процессор от старой термопасты/композита.

Шаг 10

Dell Inspiron n5110 heat sink and thermal paste replacement: step 10, image 1 of 3Dell Inspiron n5110 heat sink and thermal paste replacement: step 10, image 2 of 3Dell Inspiron n5110 heat sink and thermal paste replacement: step 10, image 3 of 3

Теперь нанесите на процессор новую термопасту/композит. Покройте всю поверхность кристалла процессора термопастой.

.

Пожалуйста, ПОДПИСЫВАЙТЕСЬ на мой канал ツ

Комментировать
90 просмотров
Комментариев нет, будьте первым кто его оставит

Это интересно
No Image Гайды
0 комментариев
No Image Гайды
0 комментариев
No Image Гайды
0 комментариев