No Image

Замена платы кнопок питания и извлечения PlayStation 5

СОДЕРЖАНИЕ
148 просмотров
10 декабря 2023

Введение

Следуйте этому руководству, чтобы извлечь и заменить плату кнопки питания и извлечения на PlayStation 5.

Перед началом работы полностью выключите питание и отсоедините все кабели от консоли. При ремонте консоли не забывайте соблюдать общие правила техники безопасности при электростатическом разряде (ESD).

Шаг 1 Открутите винт крепления подставки

PlayStation 5 Power and Eject Button Board Replacement, Remove the stand screw: step 1, image 1 of 1

Если консоль PlayStation 5 находится в вертикальном положении, переверните ее так, чтобы подставка была направлена вверх.

Если PlayStation 5 находится в горизонтальном положении, перейдите к шагу 6.

Работайте на ровной поверхности, чтобы PlayStation не упала.

Используйте монету или плоскую отвертку, чтобы выкрутить винт подставки длиной 26,5 мм.

Шаг 2 Снимите вертикальную подставку

PlayStation 5 Power and Eject Button Board Replacement, Remove the vertical stand: step 2, image 1 of 2PlayStation 5 Power and Eject Button Board Replacement, Remove the vertical stand: step 2, image 2 of 2

Чтобы снять подставку, поднимите ее прямо вверх.

Шаг 3 Храните винт подставки

PlayStation 5 Power and Eject Button Board Replacement, Store the stand screw: step 3, image 1 of 2PlayStation 5 Power and Eject Button Board Replacement, Store the stand screw: step 3, image 2 of 2

Вставьте винт в углубление в нижней части подставки.

Шаг 4 Закройте отверстие для винта

PlayStation 5 Power and Eject Button Board Replacement, Cap the screw hole: step 4, image 1 of 3PlayStation 5 Power and Eject Button Board Replacement, Cap the screw hole: step 4, image 2 of 3PlayStation 5 Power and Eject Button Board Replacement, Cap the screw hole: step 4, image 3 of 3

С помощью пинцета или ногтя снимите колпачок с отверстия.

Пальцем вдавите крышку в отверстие для винта.

Шаг 5 Закройте шкафчик

PlayStation 5 Power and Eject Button Board Replacement, Close the cubby: step 5, image 1 of 3PlayStation 5 Power and Eject Button Board Replacement, Close the cubby: step 5, image 2 of 3PlayStation 5 Power and Eject Button Board Replacement, Close the cubby: step 5, image 3 of 3

Поверните подставку против часовой стрелки, чтобы закрыть отделение.

Шаг 6 Снимите горизонтальную подставку

PlayStation 5 Power and Eject Button Board Replacement, Remove the horizontal stand: step 6, image 1 of 2PlayStation 5 Power and Eject Button Board Replacement, Remove the horizontal stand: step 6, image 2 of 2

Если PlayStation 5 находится в горизонтальном положении, положите ее на лицо так, чтобы порт зарядки был направлен вверх.

Поднимите подставку прямо вверх, чтобы снять ее.

Шаг 7. Снимите правую лицевую панель

PlayStation 5 Power and Eject Button Board Replacement, Remove the right faceplate: step 7, image 1 of 3PlayStation 5 Power and Eject Button Board Replacement, Remove the right faceplate: step 7, image 2 of 3PlayStation 5 Power and Eject Button Board Replacement, Remove the right faceplate: step 7, image 3 of 3

Переверните устройство так, чтобы порты USB и Ethernet находились слева от вас.

Поднимите угол лицевой панели, чтобы отсоединить ее от корпуса.

Шаг 8

PlayStation 5 Power and Eject Button Board Replacement: step 8, image 1 of 2PlayStation 5 Power and Eject Button Board Replacement: step 8, image 2 of 2

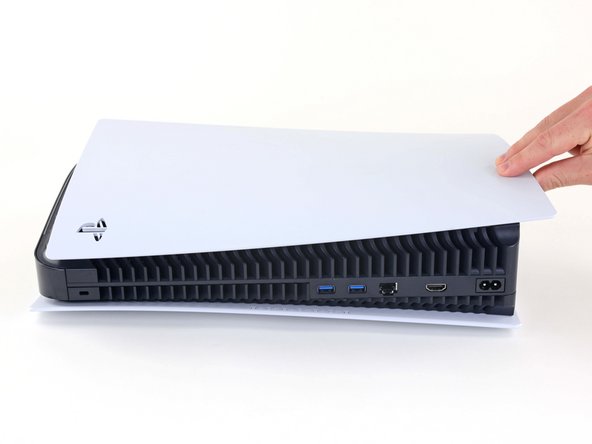
Приподнимая уголок, сдвиньте лицевую панель к нижней части устройства.

Снимите правую лицевую панель.

Шаг 9 Подденьте решетку радиатора

PlayStation 5 Power and Eject Button Board Replacement, Pry up the grille: step 9, image 1 of 3PlayStation 5 Power and Eject Button Board Replacement, Pry up the grille: step 9, image 2 of 3PlayStation 5 Power and Eject Button Board Replacement, Pry up the grille: step 9, image 3 of 3

Вставьте плоский конец лопатки под решетку и в щель над вентилятором.

Подденьте решетку, чтобы отделить ее от корпуса.

Шаг 10 Снимите решетку

PlayStation 5 Power and Eject Button Board Replacement, Remove the grille: step 10, image 1 of 2PlayStation 5 Power and Eject Button Board Replacement, Remove the grille: step 10, image 2 of 2

Поднимите решетку от корпуса, чтобы снять ее.

Шаг 11 Выкрутите винты кожуха вентилятора

PlayStation 5 Power and Eject Button Board Replacement, Remove the fan shroud screws: step 11, image 1 of 1Замена платы кнопок питания и извлечения PlayStation 5

С помощью ключа TR8 Torx открутите четыре винта, крепящие кожух вентилятора к корпусу:

Два винта длиной 23,3 мм

Один винт длиной 11,4 мм

Один винт длиной 31 мм.

На протяжении всего ремонта следите за каждым винтом и убедитесь, что он возвращается на место, чтобы не повредить консоль.

Шаг 12 Снимите кожух вентилятора

PlayStation 5 Power and Eject Button Board Replacement, Remove the fan shroud: step 12, image 1 of 2PlayStation 5 Power and Eject Button Board Replacement, Remove the fan shroud: step 12, image 2 of 2

Поднимите кожух вентилятора прямо вверх, чтобы снять его.

Шаг 13 Снимите кожух провода

PlayStation 5 Power and Eject Button Board Replacement, Remove the wire cover: step 13, image 1 of 3PlayStation 5 Power and Eject Button Board Replacement, Remove the wire cover: step 13, image 2 of 3PlayStation 5 Power and Eject Button Board Replacement, Remove the wire cover: step 13, image 3 of 3

Вставьте плоский конец пассатижей под черную крышку провода и в щель над проводами вентилятора.

Поддевайте только кожух, а не сами провода вентилятора.

С помощью пробойника подденьте кожух проводов, пока не сможете захватить его пальцами.

Шаг 14

PlayStation 5 Power and Eject Button Board Replacement: step 14, image 1 of 3PlayStation 5 Power and Eject Button Board Replacement: step 14, image 2 of 3PlayStation 5 Power and Eject Button Board Replacement: step 14, image 3 of 3

Пальцами отделите кожух провода.

Шаг 15 Отсоедините вентилятор

PlayStation 5 Power and Eject Button Board Replacement, Disconnect the fan: step 15, image 1 of 2PlayStation 5 Power and Eject Button Board Replacement, Disconnect the fan: step 15, image 2 of 2

Возьмитесь пальцами за края разъема кабеля вентилятора и потяните вверх, чтобы отсоединить его от материнской платы.

Всегда тяните кабели за их разъемы, а не за сами провода.

Шаг 16 Извлеките вентилятор

PlayStation 5 Power and Eject Button Board Replacement, Remove the fan: step 16, image 1 of 3PlayStation 5 Power and Eject Button Board Replacement, Remove the fan: step 16, image 2 of 3PlayStation 5 Power and Eject Button Board Replacement, Remove the fan: step 16, image 3 of 3

Поднимите вентилятор вверх и выньте из корпуса, чтобы снять его.

Шаг 17 Снимите крышку твердотельного накопителя

PlayStation 5 Power and Eject Button Board Replacement, Remove the SSD cover: step 17, image 1 of 1

С помощью крестовой отвертки открутите винт крышки SSD длиной 17 мм.

Шаг 18

PlayStation 5 Power and Eject Button Board Replacement: step 18, image 1 of 3PlayStation 5 Power and Eject Button Board Replacement: step 18, image 2 of 3PlayStation 5 Power and Eject Button Board Replacement: step 18, image 3 of 3

Пальцем сдвиньте крышку SSD в сторону верхней части устройства, чтобы отсоединить ее от корпуса.

Снимите крышку твердотельного накопителя.

Шаг 19 Извлеките провод оптического привода

PlayStation 5 Power and Eject Button Board Replacement, Remove the optical drive wire: step 19, image 1 of 2PlayStation 5 Power and Eject Button Board Replacement, Remove the optical drive wire: step 19, image 2 of 2

Возьмитесь пальцами за края разъема кабеля оптического привода и потяните вверх, чтобы отсоединить его от материнской платы.

Всегда тяните кабели за их разъемы, а не за сами провода.

Шаг 20

PlayStation 5 Power and Eject Button Board Replacement: step 20, image 1 of 2PlayStation 5 Power and Eject Button Board Replacement: step 20, image 2 of 2

Возьмитесь пальцами за края разъема кабеля оптического привода и потяните вверх, чтобы отсоединить его от оптического привода.

Шаг 21 Снимите наклейку с защитой от несанкционированного доступа

PlayStation 5 Power and Eject Button Board Replacement, Remove the tamper-evident sticker: step 21, image 1 of 3PlayStation 5 Power and Eject Button Board Replacement, Remove the tamper-evident sticker: step 21, image 2 of 3PlayStation 5 Power and Eject Button Board Replacement, Remove the tamper-evident sticker: step 21, image 3 of 3

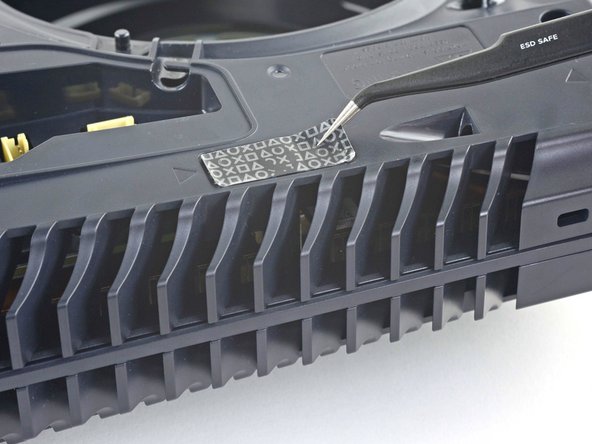
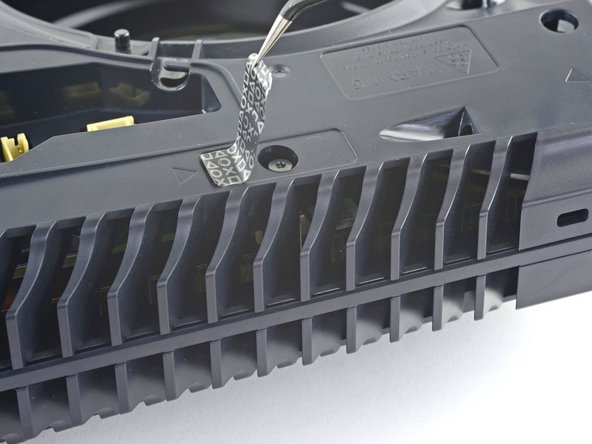
С помощью пинцета снимите наклейку с индикатором вскрытия, закрывающую оставшийся винт корпуса.

Если PlayStation 5 ранее не вскрывалась, наклейка будет полностью черной. После ее удаления появится рисунок.

Технически это наклейки с индикатором вскрытия, но не волнуйтесь — Sony не может лишить вас гарантии, если вы ничего не повредили. Веселитесь!

Шаг 22 Открутите винты крепления корпуса

PlayStation 5 Power and Eject Button Board Replacement, Remove the case screws: step 22, image 1 of 1

С помощью ключа T8 Torx открутите одиннадцать винтов, крепящих корпус:

Шесть винтов длиной 18,6 мм

Два винта длиной 23,3 мм

Два винта длиной 43,2 мм

Один винт длиной 7,3 мм

Шаг 23 Снимите корпус

PlayStation 5 Power and Eject Button Board Replacement, Remove the case: step 23, image 1 of 2PlayStation 5 Power and Eject Button Board Replacement, Remove the case: step 23, image 2 of 2

Поднимите корпус прямо вверх, чтобы снять его.

Шаг 24 Извлеките ленточный кабель оптического привода

PlayStation 5 Power and Eject Button Board Replacement, Remove the optical drive ribbon cable: step 24, image 1 of 3PlayStation 5 Power and Eject Button Board Replacement, Remove the optical drive ribbon cable: step 24, image 2 of 3PlayStation 5 Power and Eject Button Board Replacement, Remove the optical drive ribbon cable: step 24, image 3 of 3

Плоским концом шила надавите на металлический фиксирующий выступ разъема оптического привода.

Когда металлический выступ отжат, с помощью пинцета потяните за синий язычок прямо от разъема, чтобы отсоединить кабель от оптического привода.

Тяните только за выступ, а не за сам кабель.

Шаг 25 Извлеките оптический привод

PlayStation 5 Power and Eject Button Board Replacement, Remove the optical drive: step 25, image 1 of 2PlayStation 5 Power and Eject Button Board Replacement, Remove the optical drive: step 25, image 2 of 2

Поднимите оптический привод от устройства, чтобы извлечь его.

Шаг 26 Извлеките ленточный кабель оптического привода

PlayStation 5 Power and Eject Button Board Replacement, Remove the optical drive ribbon cable: step 26, image 1 of 3PlayStation 5 Power and Eject Button Board Replacement, Remove the optical drive ribbon cable: step 26, image 2 of 3PlayStation 5 Power and Eject Button Board Replacement, Remove the optical drive ribbon cable: step 26, image 3 of 3

Плоским концом шила надавите на металлический фиксирующий выступ разъема оптического привода.

Отжав металлический выступ, с помощью пинцета оттяните синий выступ прямо от разъема, чтобы отсоединить кабель от материнской платы.

Шаг 27 Отсоедините ленточный кабель питания и кнопки выброса

PlayStation 5 Power and Eject Button Board Replacement, Remove the power and eject button ribbon cable: step 27, image 1 of 2PlayStation 5 Power and Eject Button Board Replacement, Remove the power and eject button ribbon cable: step 27, image 2 of 2

С помощью пинцета оттяните синий язычок прямо от разъема, чтобы отсоединить ленточный кабель кнопки питания и выброса.

Шаг 28 Отсоедините ленточный кабель светодиода

PlayStation 5 Power and Eject Button Board Replacement, Remove the LED ribbon cable: step 28, image 1 of 2PlayStation 5 Power and Eject Button Board Replacement, Remove the LED ribbon cable: step 28, image 2 of 2

С помощью пинцета потяните за синий язычок прямо от разъема, чтобы отсоединить ленточный кабель светодиода.

Шаг 29 Отсоедините провода антенны

PlayStation 5 Power and Eject Button Board Replacement, Remove the antenna wires: step 29, image 1 of 3PlayStation 5 Power and Eject Button Board Replacement, Remove the antenna wires: step 29, image 2 of 3PlayStation 5 Power and Eject Button Board Replacement, Remove the antenna wires: step 29, image 3 of 3

Возьмите пинцетом белый провод антенны Wi-Fi за его металлическое основание, как можно ближе к разъему.

Поднимите разъем провода прямо вверх, чтобы отсоединить его от материнской платы.

Повторите процедуру для черного провода антенны Wi-Fi.

В некоторых модификациях плат эти антенные провода могут отсутствовать. Если на вашей плате отсутствуют эти разъемы, пропустите этот шаг.

Шаг 30

PlayStation 5 Power and Eject Button Board Replacement: step 30, image 1 of 3PlayStation 5 Power and Eject Button Board Replacement: step 30, image 2 of 3PlayStation 5 Power and Eject Button Board Replacement: step 30, image 3 of 3

Пинцетом возьмите черный или синий провод антенны блока питания за его металлическое основание, как можно ближе к разъему.

Поднимите разъем провода прямо вверх, чтобы отсоединить его от материнской платы.

Повторите процедуру для белого провода антенны блока питания.

Шаг 31 Удалите белые наклейки

PlayStation 5 Power and Eject Button Board Replacement, Remove the white stickers: step 31, image 1 of 3PlayStation 5 Power and Eject Button Board Replacement, Remove the white stickers: step 31, image 2 of 3PlayStation 5 Power and Eject Button Board Replacement, Remove the white stickers: step 31, image 3 of 3

С помощью пинцета отклейте белую наклейку, прикрепляющую провода антенны к верхней защитной пластине.

Извлеките провода антенны из-под наклейки.

Прижмите белую наклейку обратно к верхней защитной пластине, чтобы ее можно было использовать повторно.

Шаг 32

PlayStation 5 Power and Eject Button Board Replacement: step 32, image 1 of 3PlayStation 5 Power and Eject Button Board Replacement: step 32, image 2 of 3PlayStation 5 Power and Eject Button Board Replacement: step 32, image 3 of 3

Повторите предыдущий шаг, чтобы отклеить четыре оставшиеся наклейки.

Шаг 33

PlayStation 5 Power and Eject Button Board Replacement: step 33, image 1 of 3PlayStation 5 Power and Eject Button Board Replacement: step 33, image 2 of 3PlayStation 5 Power and Eject Button Board Replacement: step 33, image 3 of 3

Пинцетом отклейте белую наклейку, прикрепляющую кабель светодиодной ленты к радиатору.

Извлеките кабель светодиодной ленты из-под наклейки.

Прижмите белую наклейку обратно к радиатору, чтобы ее можно было использовать повторно.

Шаг 34 Выкрутите винты верхней защитной пластины

PlayStation 5 Power and Eject Button Board Replacement, Remove the top shield plate screws: step 34, image 1 of 1

С помощью ключа T8 Torx открутите сорок два винта, крепящих верхнюю защитную пластину:

Сорок один винт длиной 7,3 мм

Один винт длиной 43,2 мм

Шаг 35 Снимите верхнюю защитную пластину

PlayStation 5 Power and Eject Button Board Replacement, Remove the top shield plate: step 35, image 1 of 3PlayStation 5 Power and Eject Button Board Replacement, Remove the top shield plate: step 35, image 2 of 3PlayStation 5 Power and Eject Button Board Replacement, Remove the top shield plate: step 35, image 3 of 3

Поднимите верхнюю защитную пластину с материнской платы, чтобы снять ее.

Шаг 36 Отсоедините плату USB

PlayStation 5 Power and Eject Button Board Replacement, Disconnect the USB board: step 36, image 1 of 3PlayStation 5 Power and Eject Button Board Replacement, Disconnect the USB board: step 36, image 2 of 3PlayStation 5 Power and Eject Button Board Replacement, Disconnect the USB board: step 36, image 3 of 3

Пальцем нажмите на металлический фиксирующий выступ на разъеме кабеля USB платы.

Когда металлический выступ отжат, поднесите плоский конец палочки к изолирующей пенопластовой прокладке на ленточном кабеле и потяните его прямо от разъема, чтобы отсоединить его.

Шаг 37 Снимите левую лицевую панель

PlayStation 5 Power and Eject Button Board Replacement, Remove the left faceplate: step 37, image 1 of 3PlayStation 5 Power and Eject Button Board Replacement, Remove the left faceplate: step 37, image 2 of 3PlayStation 5 Power and Eject Button Board Replacement, Remove the left faceplate: step 37, image 3 of 3

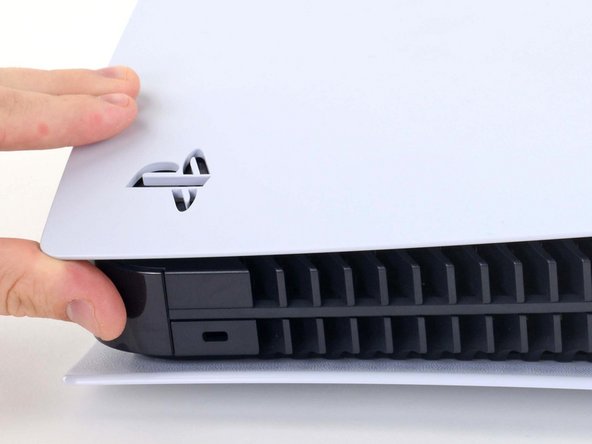
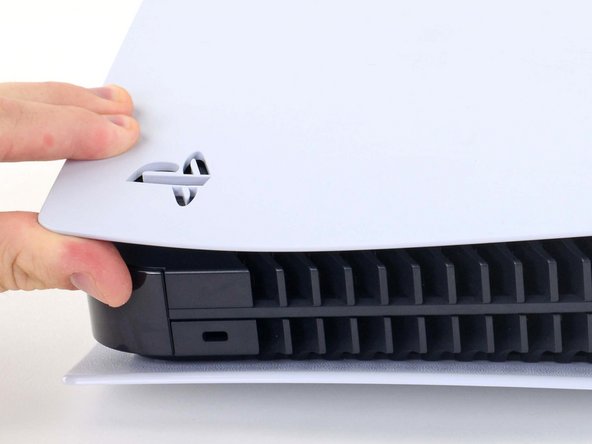
Поднимите угол лицевой панели с логотипом PlayStation, чтобы отсоединить ее от корпуса.

Шаг 38

PlayStation 5 Power and Eject Button Board Replacement: step 38, image 1 of 2PlayStation 5 Power and Eject Button Board Replacement: step 38, image 2 of 2

Приподнимая уголок, сдвиньте лицевую панель к нижней части устройства.

Снимите левую лицевую панель.

Шаг 39 Извлечение винтов

PlayStation 5 Power and Eject Button Board Replacement, Remove the screws: step 39, image 1 of 1

С помощью драйвера Torx T8 выкрутите два винта длиной 29,4 мм, крепящих корпус к материнской плате и радиатору.

Шаг 40 Снимите корпус

PlayStation 5 Power and Eject Button Board Replacement, Remove the case: step 40, image 1 of 3PlayStation 5 Power and Eject Button Board Replacement, Remove the case: step 40, image 2 of 3PlayStation 5 Power and Eject Button Board Replacement, Remove the case: step 40, image 3 of 3

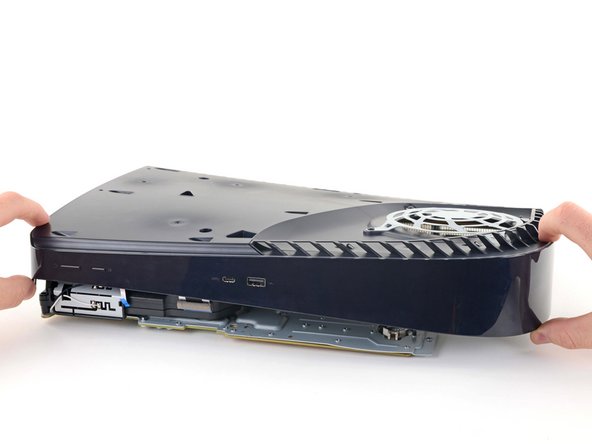
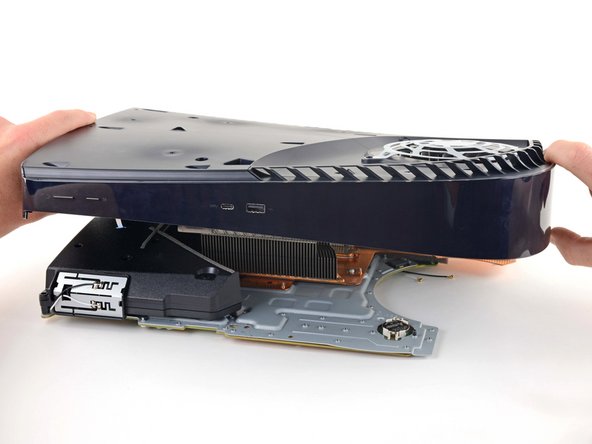
Поднимите передний край корпуса с материнской платы и радиатора в сборе.

Приподняв передний край, сдвиньте корпус назад, в сторону от материнской платы и радиатора, чтобы вывести порт для зарядки из своего гнезда в корпусе.

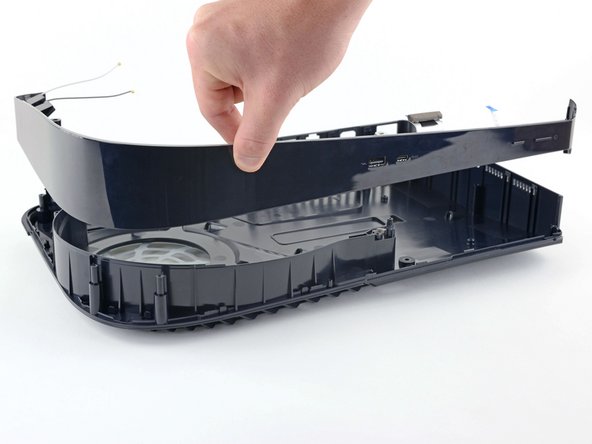
Снимите корпус.

Шаг 41 Снятие средней панели

PlayStation 5 Power and Eject Button Board Replacement, Remove the middle panel: step 41, image 1 of 2PlayStation 5 Power and Eject Button Board Replacement, Remove the middle panel: step 41, image 2 of 2

Поднимите вверх, чтобы снять среднюю панель с корпуса.

Шаг 42 Открутите винты

PlayStation 5 Power and Eject Button Board Replacement, Remove the screws: step 42, image 1 of 1

С помощью крестовой отвертки выкрутите два винта длиной 6,5 мм, крепящие плату питания и кнопки выброса к средней панели.

Шаг 43 Извлеките плату питания и кнопки выброса

PlayStation 5 Power and Eject Button Board Replacement, Remove the power and eject button board: step 43, image 1 of 2PlayStation 5 Power and Eject Button Board Replacement, Remove the power and eject button board: step 43, image 2 of 2

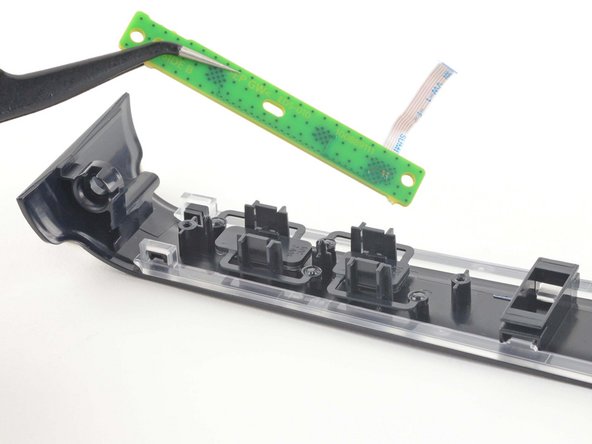
С помощью пинцета снимите плату кнопок питания и извлечения со средней панели.

Шаг 44

PlayStation 5 Power and Eject Button Board Replacement: step 44, image 1 of 2PlayStation 5 Power and Eject Button Board Replacement: step 44, image 2 of 2

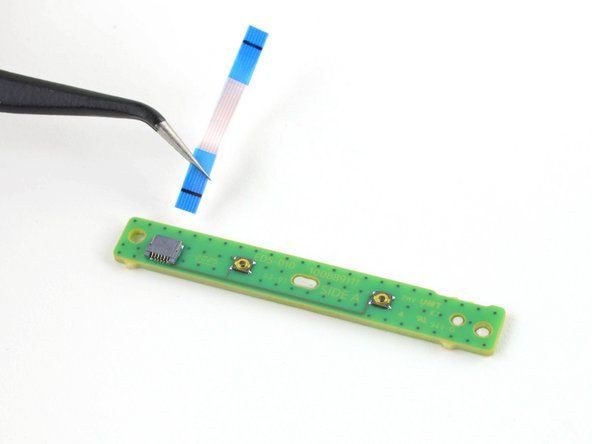
С помощью пинцета оттяните синий язычок прямо от разъема, чтобы отсоединить ленточный кабель кнопки питания и выброса.

Комментировать
148 просмотров
Комментариев нет, будьте первым кто его оставит

Это интересно
No Image Гайды
0 комментариев
No Image Гайды
0 комментариев
No Image Гайды
0 комментариев