No Image

Замена материнской платы Nest Learning Thermostat 2-го поколения

СОДЕРЖАНИЕ
97 просмотров
17 декабря 2023

Введение

Замена основной материнской платы в дисплее не представляет сложности при условии соблюдения необходимых инструкций. Для доступа к материнской плате потребуются следующие инструменты: крестовая отвертка № 0, пинцет и инструменты для открывания пластика.

Шаг 1 Снятие со стены

Nest Learning Thermostat 2nd Generation Motherboard Replacement, Removal from Wall: step 1, image 1 of 2Nest Learning Thermostat 2nd Generation Motherboard Replacement, Removal from Wall: step 1, image 2 of 2

Возьмитесь пальцами за металлическое внешнее кольцо дисплея и потяните прямо от стены.

Шаг 2 Откройте дисплей

Nest Learning Thermostat 2nd Generation Motherboard Replacement, Open Display: step 2, image 1 of 1

Переверните дисплей.

Отверткой Phillips #0 открутите четыре винта диаметром 6 мм с задней стороны дисплея.

Шаг 3 Снимите заднюю панель дисплея

Nest Learning Thermostat 2nd Generation Motherboard Replacement, Remove the back of the display: step 3, image 1 of 2Nest Learning Thermostat 2nd Generation Motherboard Replacement, Remove the back of the display: step 3, image 2 of 2

Зажмите пальцами серый 20-контактный разъем и потяните прямо от дисплея.

Не тяните слишком сильно, так как на задней панели находится лента, соединяющая 20-контактный разъем с дисплеем.

Шаг 4 Отсоедините ленточный кабель базового подключения.

Nest Learning Thermostat 2nd Generation Motherboard Replacement, Disconnect the base connection ribbon cable.: step 4, image 1 of 3Nest Learning Thermostat 2nd Generation Motherboard Replacement, Disconnect the base connection ribbon cable.: step 4, image 2 of 3Nest Learning Thermostat 2nd Generation Motherboard Replacement, Disconnect the base connection ribbon cable.: step 4, image 3 of 3

Найдите синий язычок на конце ленты с надписью «1. Потяните».

Возьмитесь за выступ пальцами и потяните прямо от материнской платы.

Шаг 5 Извлеките батарею из основания

Nest Learning Thermostat 2nd Generation Motherboard Replacement, Lift battery from the base: step 5, image 1 of 2Nest Learning Thermostat 2nd Generation Motherboard Replacement, Lift battery from the base: step 5, image 2 of 2

Найдите синий язычок с надписью «2. Потяните».

С помощью пинцета потяните батарею вверх и в сторону от дисплея.

Не тяните слишком сильно, так как батарея все еще подключена к материнской плате и должна быть отсоединена.

Шаг 6 Отсоедините аккумулятор от материнской платы

Nest Learning Thermostat 2nd Generation Motherboard Replacement, Disconnect the battery from the motherboard: step 6, image 1 of 2Nest Learning Thermostat 2nd Generation Motherboard Replacement, Disconnect the battery from the motherboard: step 6, image 2 of 2

Найдите синий язычок с надписью «3 unplug».

Возьмитесь за батарею пальцами. Осторожно потяните в сторону от дисплея, чтобы отсоединить батарею от материнской платы.

Шаг 7 Извлеките батарею из дисплея

Nest Learning Thermostat 2nd Generation Motherboard Replacement, Remove battery from the display: step 7, image 1 of 3Nest Learning Thermostat 2nd Generation Motherboard Replacement, Remove battery from the display: step 7, image 2 of 3Nest Learning Thermostat 2nd Generation Motherboard Replacement, Remove battery from the display: step 7, image 3 of 3

Возьмитесь за батарею пальцами и потяните прямо от материнской платы, чтобы отделить батарею от дисплея.

Шаг 8 Найдите датчик автоматического отключения

Nest Learning Thermostat 2nd Generation Motherboard Replacement, Locate auto-away sensor: step 8, image 1 of 1

Найдите датчик автоматического отключения.

Шаг 9 Открутите винты

Nest Learning Thermostat 2nd Generation Motherboard Replacement, Remove screws: step 9, image 1 of 2Nest Learning Thermostat 2nd Generation Motherboard Replacement, Remove screws: step 9, image 2 of 2

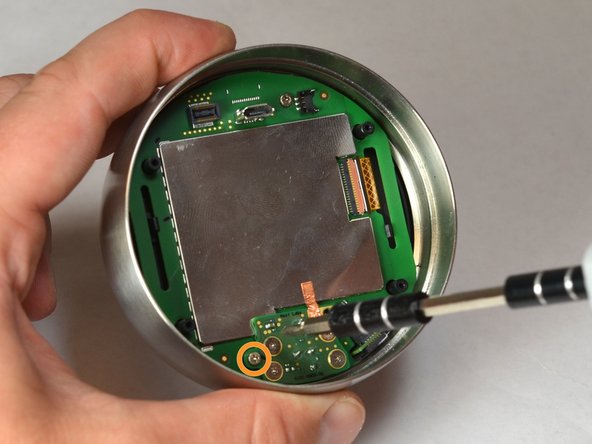
Выкрутите четыре винта диаметром 3 мм с помощью крестовой отвертки № 0.

Выкрутите один 4-миллиметровый винт, расположенный на краю датчика автоматического отключения. Используйте крестовую отвертку № 0.

Шаг 10 Извлеките датчик автовыключения

Nest Learning Thermostat 2nd Generation Motherboard Replacement, Remove auto-away sensor: step 10, image 1 of 3Nest Learning Thermostat 2nd Generation Motherboard Replacement, Remove auto-away sensor: step 10, image 2 of 3Nest Learning Thermostat 2nd Generation Motherboard Replacement, Remove auto-away sensor: step 10, image 3 of 3

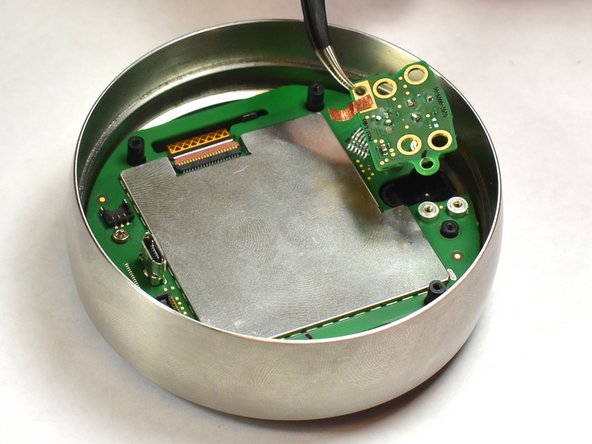
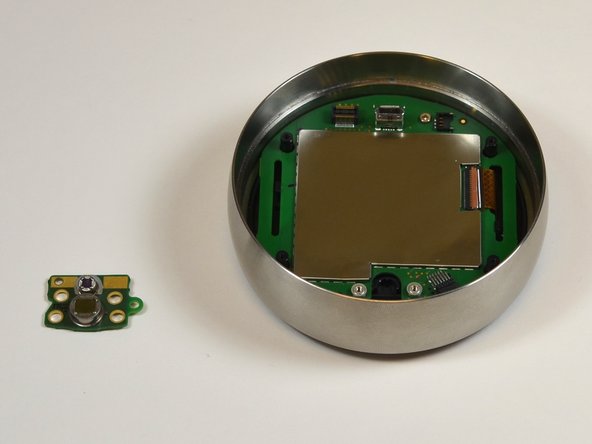
Поднимите датчик автовыключения с материнской платы с помощью пинцета.

Аккуратно отделите медную фольгу от электромагнитного экрана.

Шаг 11 Извлеките винт из материнской платы

Nest Learning Thermostat 2nd Generation Motherboard Replacement, Remove screw from motherboard: step 11, image 1 of 1

Выкрутите 4 мм винт из материнской платы с помощью крестовой отвертки #0.

Шаг 12 Удаление электромагнитного экрана

Nest Learning Thermostat 2nd Generation Motherboard Replacement, Removal of EMI Shield: step 12, image 1 of 2Nest Learning Thermostat 2nd Generation Motherboard Replacement, Removal of EMI Shield: step 12, image 2 of 2

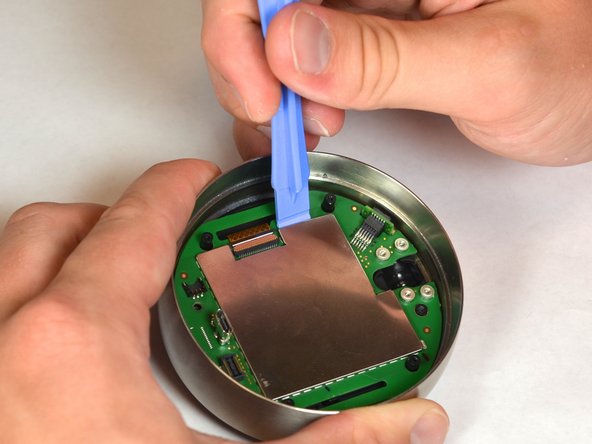
Снимите экран EMI с материнской платы, используя пластиковый инструмент для открывания.

Шаг 13 Отсоедините ленту ЖК-дисплея

Nest Learning Thermostat 2nd Generation Motherboard Replacement, Disconnect the LCD ribbon: step 13, image 1 of 2Nest Learning Thermostat 2nd Generation Motherboard Replacement, Disconnect the LCD ribbon: step 13, image 2 of 2

Осторожно отсоедините ЖК-ленту от материнской платы с помощью пинцета.

Шаг 14 Отсоедините материнскую плату от дисплея

Nest Learning Thermostat 2nd Generation Motherboard Replacement, Disconnect the motherboard from the display: step 14, image 1 of 3Nest Learning Thermostat 2nd Generation Motherboard Replacement, Disconnect the motherboard from the display: step 14, image 2 of 3Nest Learning Thermostat 2nd Generation Motherboard Replacement, Disconnect the motherboard from the display: step 14, image 3 of 3

Найдите черные выступы, которые крепят дисплей к материнской плате.

Осторожно отодвиньте черные выступы от материнской платы с помощью пластиковых инструментов для открывания.

Шаг 15 Отделите материнскую плату от дисплея

Nest Learning Thermostat 2nd Generation Motherboard Replacement, Separate the motherboard and the display: step 15, image 1 of 2Nest Learning Thermostat 2nd Generation Motherboard Replacement, Separate the motherboard and the display: step 15, image 2 of 2

Осторожно потяните лицевой дисплей в сторону от материнской платы.

Шаг 16 Отделите материнскую плату от стального кольца

Nest Learning Thermostat 2nd Generation Motherboard Replacement, Separate motherboard from steal ring: step 16, image 1 of 1

Удерживая одной рукой стальное кольцо, другой рукой осторожно выньте материнскую плату из кольца.

Комментировать
97 просмотров
Комментариев нет, будьте первым кто его оставит

Это интересно
No Image Гайды
0 комментариев
No Image Гайды
0 комментариев
No Image Гайды
0 комментариев