No Image

Замена дисплея Dell Inspiron 1420

41 просмотров
17 декабря 2023

Введение

Вы обнаружили, что ваш дисплей треснул, имеет внутренние повреждения или покрыт мертвыми пикселями? Одним из решений может быть просто замена экрана.

Шаг 1 Аккумулятор

Dell Inspiron 1420 Display Replacement, Battery: step 1, image 1 of 3Dell Inspiron 1420 Display Replacement, Battery: step 1, image 2 of 3Dell Inspiron 1420 Display Replacement, Battery: step 1, image 3 of 3

Сдвиньте два выступа, чтобы освободить аккумулятор.

Потяните батарею наружу.

Шаг 2 Снятие внешней рамки

Dell Inspiron 1420 Display Replacement, Removing the Outer Frame: step 2, image 1 of 3Dell Inspiron 1420 Display Replacement, Removing the Outer Frame: step 2, image 2 of 3Dell Inspiron 1420 Display Replacement, Removing the Outer Frame: step 2, image 3 of 3

Подденьте 6 резиновых бамперов на дисплее.

С помощью отвертки Phillips #00 выкрутите шесть 4-миллиметровых винтов, расположенных под шестью резиновыми бамперами.

Шаг 3 Снятие внешней рамки

Dell Inspiron 1420 Display Replacement, Removing the Outer Frame: step 3, image 1 of 3Dell Inspiron 1420 Display Replacement, Removing the Outer Frame: step 3, image 2 of 3Dell Inspiron 1420 Display Replacement, Removing the Outer Frame: step 3, image 3 of 3

Аккуратно подденьте рамку с помощью пробки.

С помощью отвертки Phillips #00 открутите два 5-миллиметровых винта в нижней части экрана.

Шаг 4 Отделение дисплея от рамки

Dell Inspiron 1420 Display Replacement, Separating the Display from the Frame: step 4, image 1 of 3Dell Inspiron 1420 Display Replacement, Separating the Display from the Frame: step 4, image 2 of 3Dell Inspiron 1420 Display Replacement, Separating the Display from the Frame: step 4, image 3 of 3

Подденьте рамку сверху с помощью пробки.

Поднимите черный разъем, чтобы отсоединить золотую ленту.

Шаг 5 Извлечение кабеля разъема питания

Dell Inspiron 1420 Display Replacement, Removing the Power Connector Cable: step 5, image 1 of 2Dell Inspiron 1420 Display Replacement, Removing the Power Connector Cable: step 5, image 2 of 2

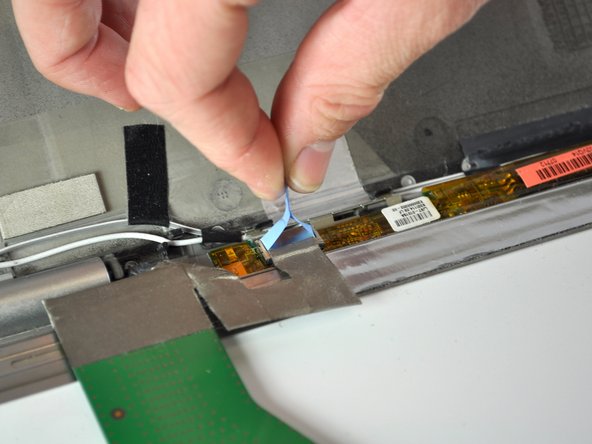
Потяните прямо вверх за светло-голубой выступ.

Шаг 6 Кабель VGA

Dell Inspiron 1420 Display Replacement, VGA cable: step 6, image 1 of 3Dell Inspiron 1420 Display Replacement, VGA cable: step 6, image 2 of 3Dell Inspiron 1420 Display Replacement, VGA cable: step 6, image 3 of 3

Сожмите два металлических зажима, расположенных на кабеле VGA.

Потяните за зажимы, чтобы извлечь кабель.

Шаг 7 Изоляция дисплея

Dell Inspiron 1420 Display Replacement, Isolating the Display: step 7, image 1 of 3Dell Inspiron 1420 Display Replacement, Isolating the Display: step 7, image 2 of 3Dell Inspiron 1420 Display Replacement, Isolating the Display: step 7, image 3 of 3

С помощью крестообразной отвертки №00 открутите три 3-миллиметровых винта, расположенных на левой и правой сторонах ноутбука.

Осторожно потянув, снимите металлические скобы, по одной с каждой стороны.

Комментировать
41 просмотров
Комментариев нет, будьте первым кто его оставит

Это интересно
No Image Гайды
0 комментариев
No Image Гайды
0 комментариев
No Image Гайды
0 комментариев