No Image

Разборка PlayStation 3 Fat 4 USB

222 просмотров
07 декабря 2023

Введение

Процесс разборки толстой PS3 с целью очистки консоли и замены термопасты.

Консоль была очень грязной внутри.

Шаг 1 Корпус консоли

PlayStation 3 Fat 4 USB Teardown, The console case: step 1, image 1 of 1

Вставить инструкции можно здесь.

Шаг 2 Открутите винты

PlayStation 3 Fat 4 USB Teardown, Remove the screws: step 2, image 1 of 3PlayStation 3 Fat 4 USB Teardown, Remove the screws: step 2, image 2 of 3PlayStation 3 Fat 4 USB Teardown, Remove the screws: step 2, image 3 of 3

Вставить инструкции можно здесь.

Шаг 3 Откройте консоль

PlayStation 3 Fat 4 USB Teardown, Open the console: step 3, image 1 of 1

Вставить инструкции можно здесь.

Шаг 4 Извлеките блок питания

PlayStation 3 Fat 4 USB Teardown, Remove the power supply: step 4, image 1 of 2PlayStation 3 Fat 4 USB Teardown, Remove the power supply: step 4, image 2 of 2

Вставить инструкции можно здесь.

Шаг 5 Плата блока питания

PlayStation 3 Fat 4 USB Teardown, The power supply board: step 5, image 1 of 3PlayStation 3 Fat 4 USB Teardown, The power supply board: step 5, image 2 of 3PlayStation 3 Fat 4 USB Teardown, The power supply board: step 5, image 3 of 3

Вставить инструкции можно здесь.

Шаг 6 Извлеките драйвер bluray

PlayStation 3 Fat 4 USB Teardown, Remove the bluray driver: step 6, image 1 of 3PlayStation 3 Fat 4 USB Teardown, Remove the bluray driver: step 6, image 2 of 3PlayStation 3 Fat 4 USB Teardown, Remove the bluray driver: step 6, image 3 of 3

Будьте очень осторожны, чтобы не сломать разъем для передачи данных, так как он очень хрупкий.

Шаг 7 Извлеките слот для SD-карты

PlayStation 3 Fat 4 USB Teardown, Remove the SD card slot: step 7, image 1 of 3PlayStation 3 Fat 4 USB Teardown, Remove the SD card slot: step 7, image 2 of 3PlayStation 3 Fat 4 USB Teardown, Remove the SD card slot: step 7, image 3 of 3

Вставить инструкции можно здесь.

Шаг 8 Извлеките плату bluethoot

PlayStation 3 Fat 4 USB Teardown, Remove the bluethoot board: step 8, image 1 of 2PlayStation 3 Fat 4 USB Teardown, Remove the bluethoot board: step 8, image 2 of 2

Вставить инструкции можно здесь.

Шаг 9 Извлеките внутреннюю материнскую плату из корпуса

PlayStation 3 Fat 4 USB Teardown, Remove the intire motherboard from the case: step 9, image 1 of 3PlayStation 3 Fat 4 USB Teardown, Remove the intire motherboard from the case: step 9, image 2 of 3PlayStation 3 Fat 4 USB Teardown, Remove the intire motherboard from the case: step 9, image 3 of 3

Вставить инструкции можно здесь.

Шаг 10 Снимите защитный кожух и экран материнской платы

PlayStation 3 Fat 4 USB Teardown, Remove the coller and mother board shield: step 10, image 1 of 3PlayStation 3 Fat 4 USB Teardown, Remove the coller and mother board shield: step 10, image 2 of 3PlayStation 3 Fat 4 USB Teardown, Remove the coller and mother board shield: step 10, image 3 of 3

Вставить инструкции можно здесь.

Шаг 11 Спецификации кулера и шарикоподшипника

PlayStation 3 Fat 4 USB Teardown, The cooler specifications and ball bearing: step 11, image 1 of 2PlayStation 3 Fat 4 USB Teardown, The cooler specifications and ball bearing: step 11, image 2 of 2

Вставить инструкции можно здесь.

Шаг 12 Гигантский и неидеальный кулер

PlayStation 3 Fat 4 USB Teardown, The gigantic and unefective cooler: step 12, image 1 of 3PlayStation 3 Fat 4 USB Teardown, The gigantic and unefective cooler: step 12, image 2 of 3PlayStation 3 Fat 4 USB Teardown, The gigantic and unefective cooler: step 12, image 3 of 3

Вставить инструкции можно здесь.

Шаг 13 Материнская плата

PlayStation 3 Fat 4 USB Teardown, The mother board: step 13, image 1 of 3PlayStation 3 Fat 4 USB Teardown, The mother board: step 13, image 2 of 3PlayStation 3 Fat 4 USB Teardown, The mother board: step 13, image 3 of 3

Вставить инструкции можно здесь.

Шаг 14 Процессоры

PlayStation 3 Fat 4 USB Teardown, The processors: step 14, image 1 of 3PlayStation 3 Fat 4 USB Teardown, The processors: step 14, image 2 of 3PlayStation 3 Fat 4 USB Teardown, The processors: step 14, image 3 of 3

Вставить инструкции можно здесь.

Шаг 15 Некоторые детали
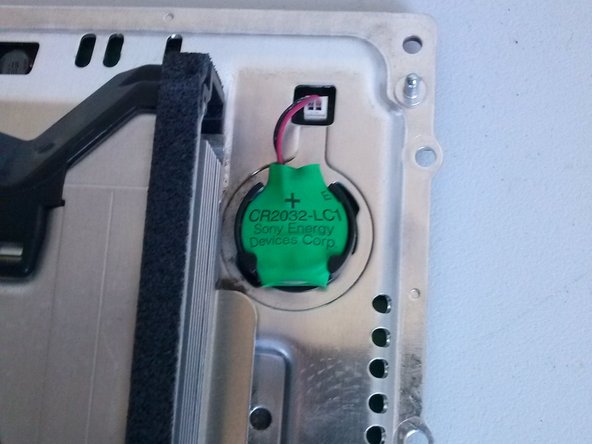
PlayStation 3 Fat 4 USB Teardown, Some details: step 15, image 1 of 3PlayStation 3 Fat 4 USB Teardown, Some details: step 15, image 2 of 3PlayStation 3 Fat 4 USB Teardown, Some details: step 15, image 3 of 3

Батарея биоса

Включение и извлечение датчиков

Главный коннектор питания переменного тока и коннектор заземления

Шаг 16 Некоторые детали

PlayStation 3 Fat 4 USB Teardown, Some details: step 16, image 1 of 2PlayStation 3 Fat 4 USB Teardown, Some details: step 16, image 2 of 2

Паз HD

Винт корпуса HD

Комментировать
222 просмотров
Комментариев нет, будьте первым кто его оставит

Это интересно
No Image Гайды
0 комментариев
No Image Гайды
0 комментариев
No Image Гайды
0 комментариев