No Image

Разборка и чистка безмешкового пылесоса Bissell Featherweight Stick серии 2033

СОДЕРЖАНИЕ
66 просмотров
12 декабря 2023

Шаг 1 Снимите удлинитель рукоятки

Disassembly and Cleaning of Series 2033 Bissell Featherweight Stick Bagless Vacuum Cleaner, Remove Handle Extension: step 1, image 1 of 3Disassembly and Cleaning of Series 2033 Bissell Featherweight Stick Bagless Vacuum Cleaner, Remove Handle Extension: step 1, image 2 of 3Disassembly and Cleaning of Series 2033 Bissell Featherweight Stick Bagless Vacuum Cleaner, Remove Handle Extension: step 1, image 3 of 3

Найдите серый выступ, расположенный прямо над выключателем питания, где синий корпус пылесоса соединяется с серым удлинителем ручки.

Поднимите выступ и потяните серый удлинитель от синего корпуса.

Шаг 2 Снимите ножку пылесоса

Disassembly and Cleaning of Series 2033 Bissell Featherweight Stick Bagless Vacuum Cleaner, Remove Vacuum Foot: step 2, image 1 of 2Disassembly and Cleaning of Series 2033 Bissell Featherweight Stick Bagless Vacuum Cleaner, Remove Vacuum Foot: step 2, image 2 of 2

Отсоедините ножку пылесоса от основного корпуса, крепко взявшись за каждую деталь и сильно потянув их в стороны

Шаг 3 Открутите опорную пластину лапки

Disassembly and Cleaning of Series 2033 Bissell Featherweight Stick Bagless Vacuum Cleaner, Unscrew Base Plate of Foot: step 3, image 1 of 2Disassembly and Cleaning of Series 2033 Bissell Featherweight Stick Bagless Vacuum Cleaner, Unscrew Base Plate of Foot: step 3, image 2 of 2

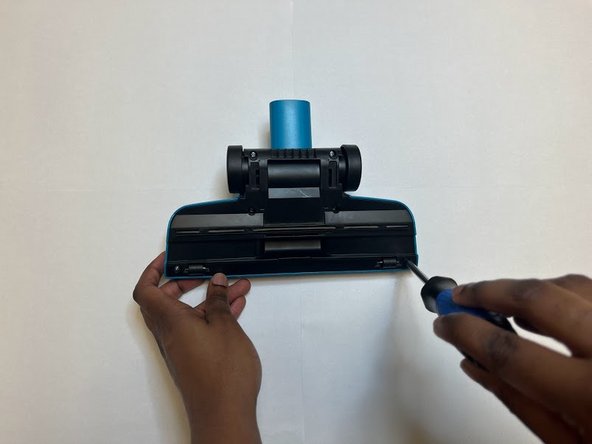
С помощью крестообразной отвертки номер 2 выкрутите 6 винтов из основания вакуумной ножки.

Сохраните винты для последующей сборки

Шаг 4 Отделите вакуумную лапку

Disassembly and Cleaning of Series 2033 Bissell Featherweight Stick Bagless Vacuum Cleaner, Separate Vacuum Foot: step 4, image 1 of 2Disassembly and Cleaning of Series 2033 Bissell Featherweight Stick Bagless Vacuum Cleaner, Separate Vacuum Foot: step 4, image 2 of 2

Крепко возьмитесь за верхнюю и нижнюю пластины вакуумной лапы

Потяните пластины в стороны, пока они не будут полностью разделены.

Шаг 5 Очистите внутреннюю поверхность лапки

Disassembly and Cleaning of Series 2033 Bissell Featherweight Stick Bagless Vacuum Cleaner, Clean Foot Interior: step 5, image 1 of 2Disassembly and Cleaning of Series 2033 Bissell Featherweight Stick Bagless Vacuum Cleaner, Clean Foot Interior: step 5, image 2 of 2

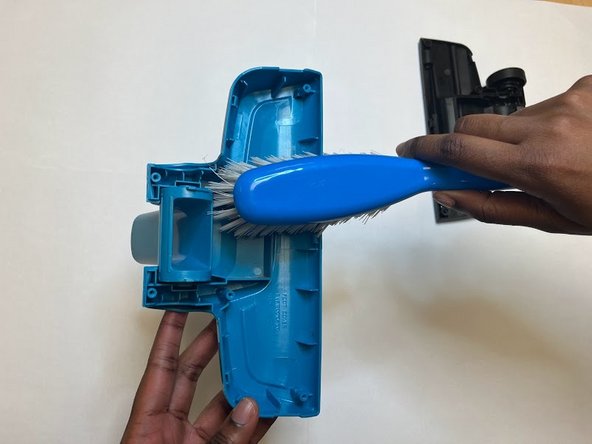
С помощью щетки среднего размера удалите грязь с пластин вакуумных лап.

Поскольку в ноге нет электрических деталей, можно не чистить ее щеткой, а промыть водой и дать высохнуть.

Шаг 6 Освободите фильтры основного корпуса

Disassembly and Cleaning of Series 2033 Bissell Featherweight Stick Bagless Vacuum Cleaner, Release Main Body Filters: step 6, image 1 of 3Disassembly and Cleaning of Series 2033 Bissell Featherweight Stick Bagless Vacuum Cleaner, Release Main Body Filters: step 6, image 2 of 3Disassembly and Cleaning of Series 2033 Bissell Featherweight Stick Bagless Vacuum Cleaner, Release Main Body Filters: step 6, image 3 of 3

Нажмите на выемку на центральной серой защелке.

Другой рукой осторожно отделите насадку от двигателя.

В фильтрующей насадке может быть грязь и мусор. Отделите части, слегка наклонив корпус вверх, чтобы избежать попадания грязи в рабочее пространство.

Шаг 7 Извлеките и опорожните отсек для фильтра

Disassembly and Cleaning of Series 2033 Bissell Featherweight Stick Bagless Vacuum Cleaner, Remove and Empty Filter Compartment: step 7, image 1 of 2Disassembly and Cleaning of Series 2033 Bissell Featherweight Stick Bagless Vacuum Cleaner, Remove and Empty Filter Compartment: step 7, image 2 of 2

Крепко сожмите серый центральный гребень фильтра и потяните в сторону от синей насадки.

Будьте осторожны при извлечении фильтра. Пыль и грязь могут высыпаться наружу.

Рекомендуется выполнять этот шаг над мусорным ведром или на улице

Шаг 8 Отклейте наклейку

Disassembly and Cleaning of Series 2033 Bissell Featherweight Stick Bagless Vacuum Cleaner, Peel Back Sticker: step 8, image 1 of 3Disassembly and Cleaning of Series 2033 Bissell Featherweight Stick Bagless Vacuum Cleaner, Peel Back Sticker: step 8, image 2 of 3Disassembly and Cleaning of Series 2033 Bissell Featherweight Stick Bagless Vacuum Cleaner, Peel Back Sticker: step 8, image 3 of 3

Найдите предупреждающую наклейку на нижней части компонента двигателя.

Откиньте половину наклейки так, чтобы она осталась прикрепленной только к одной стороне компонента

С помощью скребка поднимите один угол предупреждающей наклейки.

Шаг 9 Снятие и очистка поролонового фильтра

Disassembly and Cleaning of Series 2033 Bissell Featherweight Stick Bagless Vacuum Cleaner, Remove and Clean Foam Filter: step 9, image 1 of 2Disassembly and Cleaning of Series 2033 Bissell Featherweight Stick Bagless Vacuum Cleaner, Remove and Clean Foam Filter: step 9, image 2 of 2

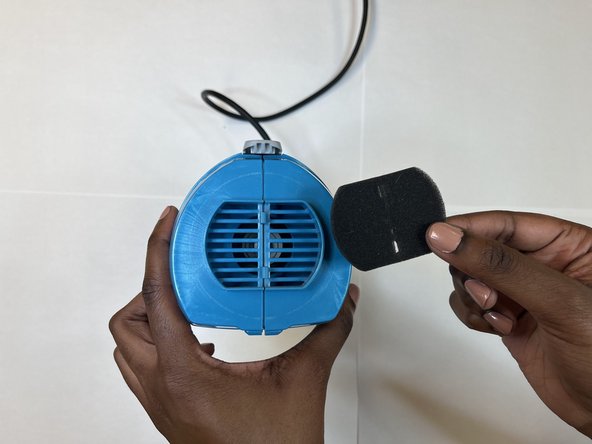
Снимите поролоновый вентиляционный фильтр. Почистите его зубной щеткой или другой небольшой щеткой с мягкой щетиной, чтобы удалить частицы грязи.

Шаг 10 Открутите корпус двигателя

Disassembly and Cleaning of Series 2033 Bissell Featherweight Stick Bagless Vacuum Cleaner, Unscrew Motor Casing: step 10, image 1 of 2Disassembly and Cleaning of Series 2033 Bissell Featherweight Stick Bagless Vacuum Cleaner, Unscrew Motor Casing: step 10, image 2 of 2

С помощью крестообразной отвертки номер 2 открутите все 7 винтов с компонента двигателя.

Сохраните винты для последующей сборки

Шаг 11 Снимите накладку удлинителя рукоятки

Disassembly and Cleaning of Series 2033 Bissell Featherweight Stick Bagless Vacuum Cleaner, Remove Handle Extension Release Tab: step 11, image 1 of 3Disassembly and Cleaning of Series 2033 Bissell Featherweight Stick Bagless Vacuum Cleaner, Remove Handle Extension Release Tab: step 11, image 2 of 3Disassembly and Cleaning of Series 2033 Bissell Featherweight Stick Bagless Vacuum Cleaner, Remove Handle Extension Release Tab: step 11, image 3 of 3

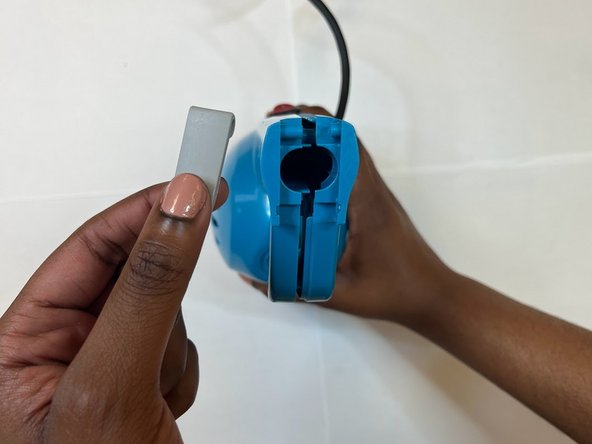
Ослабив обе половинки, раздвиньте их настолько, чтобы снять фиксатор удлинителя рукоятки с конца компонента двигателя.

сохраните защелку для последующей сборки

Шаг 12 Откройте внутренний мотор

Disassembly and Cleaning of Series 2033 Bissell Featherweight Stick Bagless Vacuum Cleaner, Expose Interior Motor: step 12, image 1 of 3Disassembly and Cleaning of Series 2033 Bissell Featherweight Stick Bagless Vacuum Cleaner, Expose Interior Motor: step 12, image 2 of 3Disassembly and Cleaning of Series 2033 Bissell Featherweight Stick Bagless Vacuum Cleaner, Expose Interior Motor: step 12, image 3 of 3

Крепко возьмитесь за обе стороны центрального компонента, расположив руки вертикально

Раздвиньте две половины, следя за тем, чтобы нижняя половина оставалась плоской.

Шаг 13 Изолируйте двигатель

Disassembly and Cleaning of Series 2033 Bissell Featherweight Stick Bagless Vacuum Cleaner, Isolate Motor: step 13, image 1 of 3Disassembly and Cleaning of Series 2033 Bissell Featherweight Stick Bagless Vacuum Cleaner, Isolate Motor: step 13, image 2 of 3Disassembly and Cleaning of Series 2033 Bissell Featherweight Stick Bagless Vacuum Cleaner, Isolate Motor: step 13, image 3 of 3

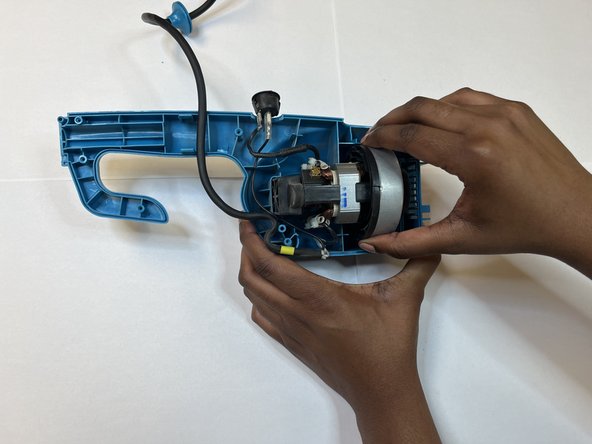
Распутайте и размотайте все шнуры и провода вокруг двигателя.

Положив компонент на ровную поверхность, аккуратно поднимите двигатель вверх и отделите его от синего пластика.

Шаг 14 Очистите двигатель

Disassembly and Cleaning of Series 2033 Bissell Featherweight Stick Bagless Vacuum Cleaner, Clean Motor: step 14, image 1 of 2Disassembly and Cleaning of Series 2033 Bissell Featherweight Stick Bagless Vacuum Cleaner, Clean Motor: step 14, image 2 of 2

Используя небольшую щетку с мягкой щетиной, аккуратно почистите двигатель, чтобы удалить всю грязь и мусор.

Комментировать
66 просмотров
Комментариев нет, будьте первым кто его оставит

Это интересно
No Image Гайды
0 комментариев
No Image Гайды
0 комментариев
No Image Гайды
0 комментариев