No Image

Как установить карданный шар Zenmuse H3-2D на DJI Phantom

СОДЕРЖАНИЕ
66 просмотров
17 декабря 2023

Введение

Используйте это руководство, чтобы установить систему карданов для камеры Zenmuse H3-2D на DJI Phantom или Phantom 2.

Шаг 1 Откройте батарейный отсек

How to Install the Zenmuse H3-2D Gimbal on a DJI Phantom, Open the Battery Compartment: step 1, image 1 of 3How to Install the Zenmuse H3-2D Gimbal on a DJI Phantom, Open the Battery Compartment: step 1, image 2 of 3How to Install the Zenmuse H3-2D Gimbal on a DJI Phantom, Open the Battery Compartment: step 1, image 3 of 3

Нажмите на язычок фиксатора крышки батарейного отсека, чтобы открыть крышку.

Шаг 2 Извлеките аккумулятор

How to Install the Zenmuse H3-2D Gimbal on a DJI Phantom, Remove the Battery: step 2, image 1 of 3How to Install the Zenmuse H3-2D Gimbal on a DJI Phantom, Remove the Battery: step 2, image 2 of 3How to Install the Zenmuse H3-2D Gimbal on a DJI Phantom, Remove the Battery: step 2, image 3 of 3

Вытащите аккумуляторный блок.

Не тяните за провода батареи, чрезмерное напряжение может привести к поломке проводов, повреждению разъемов питания или трещинам на внутренних паяных соединениях.

Шаг 3 Отсоедините батарею

How to Install the Zenmuse H3-2D Gimbal on a DJI Phantom, Disconnect the Battery: step 3, image 1 of 2How to Install the Zenmuse H3-2D Gimbal on a DJI Phantom, Disconnect the Battery: step 3, image 2 of 2

Потяните две половинки разъема питания XT60 в стороны.

Он плотно прилегает, поэтому будьте осторожны, чтобы не задеть дрон или не дернуть за кабели, когда он отсоединяется!

Шаг 4 Идентификация серебряных и черных цанг

How to Install the Zenmuse H3-2D Gimbal on a DJI Phantom, Identifying Silver and Black Collets: step 4, image 1 of 2How to Install the Zenmuse H3-2D Gimbal on a DJI Phantom, Identifying Silver and Black Collets: step 4, image 2 of 2

Цанги пропеллеров с серебряной вершиной откручиваются против часовой стрелки

Цанги для пропеллеров с черной вершиной откручиваются по часовой стрелке

Шаг 5 Откручивание серебряных цанг

How to Install the Zenmuse H3-2D Gimbal on a DJI Phantom, Unscrewing Silver Collets: step 5, image 1 of 3How to Install the Zenmuse H3-2D Gimbal on a DJI Phantom, Unscrewing Silver Collets: step 5, image 2 of 3How to Install the Zenmuse H3-2D Gimbal on a DJI Phantom, Unscrewing Silver Collets: step 5, image 3 of 3

Для пропеллеров с серебряными цангами: С помощью ключа или торцевой головки на 12 мм ослабьте серебряные цанги против часовой стрелки.

После освобождения открутите и снимите цангу.

Шаг 6 Откручивание черных цанг

How to Install the Zenmuse H3-2D Gimbal on a DJI Phantom, Unscrewing Black Collets: step 6, image 1 of 3How to Install the Zenmuse H3-2D Gimbal on a DJI Phantom, Unscrewing Black Collets: step 6, image 2 of 3How to Install the Zenmuse H3-2D Gimbal on a DJI Phantom, Unscrewing Black Collets: step 6, image 3 of 3

Для пропеллеров с черными цангами: С помощью ключа или торцевой головки на 12 мм ослабьте черные цанги по часовой стрелке.

После освобождения открутите и снимите цангу.

Шаг 7 Снимите пропеллер

How to Install the Zenmuse H3-2D Gimbal on a DJI Phantom, Remove the Propeller: step 7, image 1 of 3How to Install the Zenmuse H3-2D Gimbal on a DJI Phantom, Remove the Propeller: step 7, image 2 of 3How to Install the Zenmuse H3-2D Gimbal on a DJI Phantom, Remove the Propeller: step 7, image 3 of 3

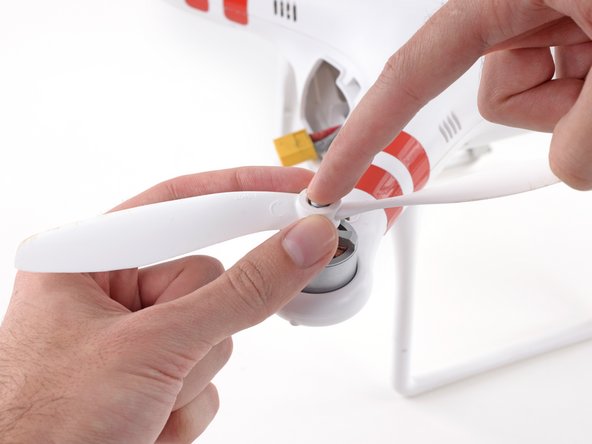
Аккуратно нажмите на вал двигателя и поднимите пропеллер вверх, чтобы снять его.

Шаг 8 Открутите винты корпуса

How to Install the Zenmuse H3-2D Gimbal on a DJI Phantom, Remove Case Screws: step 8, image 1 of 3How to Install the Zenmuse H3-2D Gimbal on a DJI Phantom, Remove Case Screws: step 8, image 2 of 3How to Install the Zenmuse H3-2D Gimbal on a DJI Phantom, Remove Case Screws: step 8, image 3 of 3

После снятия всех четырех пропеллеров переверните дрон.

Открутите следующие винты с нижней стороны дрона:

Двенадцать шестигранных винтов 2,0 мм

Четыре винта Phillips #0

Шаг 9 Отсоедините магнитометр

How to Install the Zenmuse H3-2D Gimbal on a DJI Phantom, Unplug Magnetometer: step 9, image 1 of 3How to Install the Zenmuse H3-2D Gimbal on a DJI Phantom, Unplug Magnetometer: step 9, image 2 of 3How to Install the Zenmuse H3-2D Gimbal on a DJI Phantom, Unplug Magnetometer: step 9, image 3 of 3

Отсоедините кабель от пластикового шасси.

Отсоедините молексный разъем магнитометра.

Шаг 10 Снимите верхний кожух

How to Install the Zenmuse H3-2D Gimbal on a DJI Phantom, Remove the Top Shell: step 10, image 1 of 3How to Install the Zenmuse H3-2D Gimbal on a DJI Phantom, Remove the Top Shell: step 10, image 2 of 3How to Install the Zenmuse H3-2D Gimbal on a DJI Phantom, Remove the Top Shell: step 10, image 3 of 3

Поднимите верхнюю часть корпуса и положите ее на бок.

Не пытайтесь полностью снять корпус. Кабели GPS и магнитометра соединяют верхнюю часть корпуса с остальными частями Phantom, будьте осторожны, чтобы не повредить и не сломать эти кабели.

Шаг 11 Отсоедините кабель GPS

How to Install the Zenmuse H3-2D Gimbal on a DJI Phantom, Disconnect GPS Cable: step 11, image 1 of 2How to Install the Zenmuse H3-2D Gimbal on a DJI Phantom, Disconnect GPS Cable: step 11, image 2 of 2

Поднимите молексный разъем кабеля GPS из гнезда на основной плате.

Шаг 12 Ослабьте кабель магнитометра

How to Install the Zenmuse H3-2D Gimbal on a DJI Phantom, Loosen Magnetometer Cable: step 12, image 1 of 3How to Install the Zenmuse H3-2D Gimbal on a DJI Phantom, Loosen Magnetometer Cable: step 12, image 2 of 3How to Install the Zenmuse H3-2D Gimbal on a DJI Phantom, Loosen Magnetometer Cable: step 12, image 3 of 3

Аккуратно вытяните слабину кабеля магнитометра через нижнюю крышку корпуса.

Верхняя оболочка корпуса теперь должна иметь достаточную слабину для работы с внутренними частями Phantom.

Шаг 13 Подготовьте кабель разъема G8

How to Install the Zenmuse H3-2D Gimbal on a DJI Phantom, Prepare G8 Connector Cable: step 13, image 1 of 3How to Install the Zenmuse H3-2D Gimbal on a DJI Phantom, Prepare G8 Connector Cable: step 13, image 2 of 3How to Install the Zenmuse H3-2D Gimbal on a DJI Phantom, Prepare G8 Connector Cable: step 13, image 3 of 3

Скрутите молекс и кабель, как показано на рисунке, чтобы подготовить его к вставке через нижнюю оболочку корпуса.

Шаг 14 Пропустите разъем G8 через корпус

How to Install the Zenmuse H3-2D Gimbal on a DJI Phantom, Pass the G8 connector through the case: step 14, image 1 of 3How to Install the Zenmuse H3-2D Gimbal on a DJI Phantom, Pass the G8 connector through the case: step 14, image 2 of 3How to Install the Zenmuse H3-2D Gimbal on a DJI Phantom, Pass the G8 connector through the case: step 14, image 3 of 3

Вставьте разъем molex через одно из отверстий шасси и нижнюю крышку корпуса.

Протяните кабель.

Это очень плотная посадка, не торопитесь и не повредите разъем molex или кабель. Мы обнаружили, что легкое покачивание разъема molex взад-вперед через отверстие в конце концов помогло его протащить.

Шаг 15 Установите монтажный кронштейн

How to Install the Zenmuse H3-2D Gimbal on a DJI Phantom, Install the mounting bracket: step 15, image 1 of 3How to Install the Zenmuse H3-2D Gimbal on a DJI Phantom, Install the mounting bracket: step 15, image 2 of 3How to Install the Zenmuse H3-2D Gimbal on a DJI Phantom, Install the mounting bracket: step 15, image 3 of 3

Установите монтажный кронштейн H3-2D на нижнюю сторону Phantom.

Совместите монтажные отверстия и вкрутите два болта, чтобы закрепить кронштейн.

Шаг 16 Подготовьте другую сторону кабеля G8

How to Install the Zenmuse H3-2D Gimbal on a DJI Phantom, Prepare the other side of the G8 cable: step 16, image 1 of 2How to Install the Zenmuse H3-2D Gimbal on a DJI Phantom, Prepare the other side of the G8 cable: step 16, image 2 of 2

Скрутите другой конец молекс-коннектора кабеля G8, как показано на рисунке, чтобы подключить карданный шар H3-2D.

Шаг 17 Подключение кардана H3-2D

How to Install the Zenmuse H3-2D Gimbal on a DJI Phantom, Plugging in the H3-2D gimbal: step 17, image 1 of 3How to Install the Zenmuse H3-2D Gimbal on a DJI Phantom, Plugging in the H3-2D gimbal: step 17, image 2 of 3How to Install the Zenmuse H3-2D Gimbal on a DJI Phantom, Plugging in the H3-2D gimbal: step 17, image 3 of 3

Пропустите молексный разъем G8 через боковую часть кардана H3-2D.

Вставьте и прочно закрепите разъем.

Шаг 18 Подключение разъема G8

How to Install the Zenmuse H3-2D Gimbal on a DJI Phantom, Plug in the G8 connector: step 18, image 1 of 3How to Install the Zenmuse H3-2D Gimbal on a DJI Phantom, Plug in the G8 connector: step 18, image 2 of 3How to Install the Zenmuse H3-2D Gimbal on a DJI Phantom, Plug in the G8 connector: step 18, image 3 of 3

Протяните провод кардана через нижнюю крышку корпуса и подключите разъем к разъему G8 на основной плате.

Шаг 19 Подготовьте карданный шар к установке

How to Install the Zenmuse H3-2D Gimbal on a DJI Phantom, Prepare the Gimbal for installation: step 19, image 1 of 2How to Install the Zenmuse H3-2D Gimbal on a DJI Phantom, Prepare the Gimbal for installation: step 19, image 2 of 2

Поместите карданный шар на крепление так, чтобы его передняя часть была обращена в ту же сторону, что и крышка батарейного отсека.

Шаг 20 Установка кардана

How to Install the Zenmuse H3-2D Gimbal on a DJI Phantom, Mounting the Gimbal: step 20, image 1 of 3How to Install the Zenmuse H3-2D Gimbal on a DJI Phantom, Mounting the Gimbal: step 20, image 2 of 3How to Install the Zenmuse H3-2D Gimbal on a DJI Phantom, Mounting the Gimbal: step 20, image 3 of 3

Установите четыре резиновых демпфера на кардане на монтажный кронштейн.

Зажмите две стороны резиновых демпферов и вдавите их в отверстия кронштейна.

Шаг 21 Убедитесь, что заслонки установлены надежно

How to Install the Zenmuse H3-2D Gimbal on a DJI Phantom, Ensure the dampers are installed securely: step 21, image 1 of 2How to Install the Zenmuse H3-2D Gimbal on a DJI Phantom, Ensure the dampers are installed securely: step 21, image 2 of 2

Убедитесь, что заслонки установлены правильно, повернув их не менее чем на 180 градусов.

Если заслонка отсоединяется, значит, она была установлена неправильно. Повторите предыдущий шаг для всех не установленных демпферов.

Шаг 22 Очистите кабель карданного шарнира

How to Install the Zenmuse H3-2D Gimbal on a DJI Phantom, Clean up the gimbal cable: step 22, image 1 of 2How to Install the Zenmuse H3-2D Gimbal on a DJI Phantom, Clean up the gimbal cable: step 22, image 2 of 2

Вытяните излишнюю слабину троса кардана вверх в корпус Phantom.

При повторной установке верхней крышки корпуса будьте осторожны, чтобы не пережать провода.

Комментировать
66 просмотров
Комментариев нет, будьте первым кто его оставит

Это интересно
No Image Гайды
0 комментариев
No Image Гайды
0 комментариев
No Image Гайды
0 комментариев